Dubbo(一):从dubbo-demo初探dubbo源码
Dubbo(二):架构与SPI
Dubbo(三):高并发下降级与限流
Dubbo(四):其他常用特性
Dubbo(五):自定义扩展
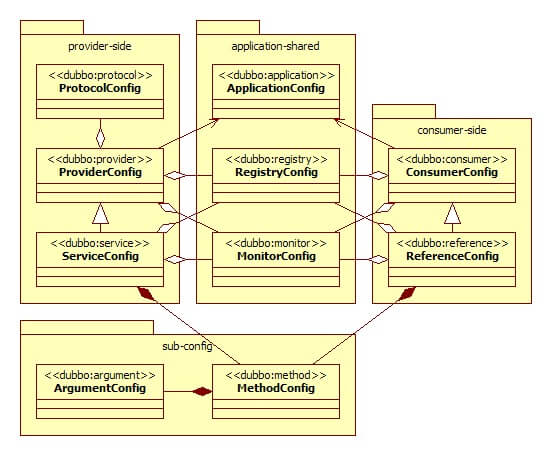
配置基础
负载均衡
负载均衡改善了跨多个计算资源(例如计算机,计算机集群,网络链接,中央处理单元或磁盘驱动的的工作负载分布。负载平衡旨在优化资源使用,最大化吞吐量,最小化响应时间,并避免任何单个资源的过载。使用具有负载平衡而不是单个组件的多个组件可以通过冗余提高可靠性和可用性。负载平衡通常涉及专用软件或硬件
dubbo提供了多种均衡策略,由@SPI注解可以看到dubbo缺省策略为random随机调用,各有:
1、Random LoadBalance:
)> 随机,按权重设置随机概率
)> 在一个截面上碰撞的概率高,但调用量越大分布越均匀,而且按概率使用权重后也比较均匀,有利于动态调整提供者权重
2、RoundRobin LoadBalance:
)> 轮询,按公约后的权重设置轮询比率
)> 存在慢的提供者累积请求的问题,比如第二台机器很慢,但没挂,当请求调到第二台时就卡在那,久而久之所有请求都卡在调到第二台上。因此可以结合权重,把第二台机(性能低的)的权重设置低一点
3、LeastActive LoadBalance:
)> 最少活跃调用数,相同活跃数的随机,活跃数指调用前后计数差
)> 使慢的提供者收到更少请求,因为越慢的提供者的调用前后计数差会越大
4、ConsistentHash LoadBalance:
)> 一致性 Hash,相同参数的请求总是发到同一提供者
)> 当某一台提供者挂时,原本发往该提供者的请求,基于虚拟节点,平摊到其它提供者,不会引起剧烈变动
)> 缺省只对第一个参数Hash,如果要修改,请配置<dubbo:parameter key="hash.arguments" value="0,1" />
)> 缺省用160份虚拟节点,如果要修改,请配置<dubbo:parameter key="hash.nodes" value="320" />
配置文件设置(也可在注解中配置):
// 服务端服务级别
<dubbo:service interface="..." loadbalance="roundrobin" />
// 服务端方法级别
<dubbo:service interface="...">
   <dubbo:method name="..." loadbalance="roundrobin"/>
</dubbo:service>

// 客户端服务级别
<dubbo:reference interface="..." loadbalance="roundrobin" />
// 客户端方法级别
<dubbo:reference interface="...">
   <dubbo:method name="..." loadbalance="roundrobin"/>
</dubbo:reference>
现所有已有负载均衡算法都继承自AbstractLoadBalance
1、先来看下RandomLoadBalance:random,实现思路是如果服务多实例权重相同,则进行随机调用;如果权重不同,按照总权重取随机数。根据总权重数生成一个随机数,然后和具体服务实例的权重进行相减做偏移量,然后找出偏移量小于0的,这种策略在随机的情况下尽可能保证权重大的服务会被随机调用:
private final Random random = new Random();

protected <T> Invoker<T> doSelect(List<Invoker<T>> invokers, URL url, Invocation invocation) {
	int length = invokers.size(); // Number of invokers 总个数
	int totalWeight = 0; // The sum of weights 总权重
	boolean sameWeight = true; // Every invoker has the same weight? 权重是否相同
	for (int i = 0; i < length; i++) {
		int weight = getWeight(invokers.get(i), invocation);
		totalWeight += weight; // Sum 累计总权重
		if (sameWeight && i > 0
				&& weight != getWeight(invokers.get(i - 1), invocation)) {
			sameWeight = false;	// 计算权重是否相同
		}
	}
	if (totalWeight > 0 && !sameWeight) {
		// If (not every invoker has the same weight & at least one invoker's weight>0), select randomly based on totalWeight.
		// 如果权重不相同,并且总权重大于0,则按总权重数随机
		int offset = random.nextInt(totalWeight);
		// Return a invoker based on the random value. 确定随机值落在哪个片断上
		for (int i = 0; i < length; i++) {
			offset -= getWeight(invokers.get(i), invocation);
			if (offset < 0) {
				return invokers.get(i);
			}
		}
	}
	// If all invokers have the same weight value or totalWeight=0, return evenly.
	// 如果权重相同,或总权重为0,则均等随机获取
	return invokers.get(random.nextInt(length));
}
2、再来看下RoundRobinLoadBalance:roundrobin,实现思路是首先计算出多服务实例的最大最小权重,如果权重都一样(maxWeight=minWeight)或为0,则直接取模轮询;如果权重不一样,先取摸出一个基础值,每一轮调用将基础值减少1直到为0,获取此时正好服务权重大于0的服务。相当于按权重比例轮循:
private final ConcurrentMap<String, AtomicPositiveInteger> sequences = new ConcurrentHashMap<String, AtomicPositiveInteger>();

protected <T> Invoker<T> doSelect(List<Invoker<T>> invokers, URL url, Invocation invocation) {
	String key = invokers.get(0).getUrl().getServiceKey() + "." + invocation.getMethodName();
	int length = invokers.size(); // Number of invokers 总个数
	int maxWeight = 0; // The maximum weight 最大权重
	int minWeight = Integer.MAX_VALUE; // The minimum weight 最小权重
	final LinkedHashMap<Invoker<T>, IntegerWrapper> invokerToWeightMap = new LinkedHashMap<Invoker<T>, IntegerWrapper>();
	int weightSum = 0; // 总权重
	for (int i = 0; i < length; i++) {
		int weight = getWeight(invokers.get(i), invocation);
		maxWeight = Math.max(maxWeight, weight); // Choose the maximum weight 替换
		minWeight = Math.min(minWeight, weight); // Choose the minimum weight 替换
		if (weight > 0) {
			invokerToWeightMap.put(invokers.get(i), new IntegerWrapper(weight));
			weightSum += weight;
		}
	}
	AtomicPositiveInteger sequence = sequences.get(key);
	if (sequence == null) {
		sequences.putIfAbsent(key, new AtomicPositiveInteger());
		sequence = sequences.get(key);
	}
	int currentSequence = sequence.getAndIncrement();
	// 按公约后的权重设置轮询比率
	if (maxWeight > 0 && minWeight < maxWeight) {
		int mod = currentSequence % weightSum;
		for (int i = 0; i < maxWeight; i++) {
			for (Map.Entry<Invoker<T>, IntegerWrapper> each : invokerToWeightMap.entrySet()) {
				final Invoker<T> k = each.getKey();
				final IntegerWrapper v = each.getValue();
				if (mod == 0 && v.getValue() > 0) {
					return k;
				}
				if (v.getValue() > 0) {
					v.decrement();
					mod--;
				}
			}
		}
	}
	// Round robin 轮循依次获取
	return invokers.get(currentSequence % length);
}
3、再来看下LeastActiveLoadBalance:leastactive,实现思路是首先查找最小活跃数的服务并统计权重和出现的频次,如果最小活跃次数只出现一次,直接使用该服务;如果出现多次且权重不相同,则按照总权重数随机;如果出现多次且权重相同,则随机调用:
private final Random random = new Random();

protected <T> Invoker<T> doSelect(List<Invoker<T>> invokers, URL url, Invocation invocation) {
	int length = invokers.size(); // Number of invokers 总个数
	int leastActive = -1; // The least active value of all invokers 最小的活跃数
	int leastCount = 0; // The number of invokers having the same least active value (leastActive) 相同最小活跃的个数
	int[] leastIndexs = new int[length]; // The index of invokers having the same least active value (leastActive) 相同最小活跃数的下标
	int totalWeight = 0; // The sum of weights 总权重
	int firstWeight = 0; // Initial value, used for comparision 第一个权重,用于计算是否相同
	boolean sameWeight = true; // Every invoker has the same weight value? 是否所有权重相同
	for (int i = 0; i < length; i++) {
		Invoker<T> invoker = invokers.get(i);
		int active = RpcStatus.getStatus(invoker.getUrl(), invocation.getMethodName()).getActive(); // Active number 获取活跃数
		int weight = invoker.getUrl().getMethodParameter(invocation.getMethodName(), Constants.WEIGHT_KEY, Constants.DEFAULT_WEIGHT); // Weight 获取权重
		if (leastActive == -1 || active < leastActive) { // Restart, when find a invoker having smaller least active value. 发现有小于最小活跃数的
			leastActive = active; // Record the current least active value 记录最小活跃数
			leastCount = 1; // Reset leastCount, count again based on current leastCount 重新统计拥有相同最小活跃数的个数
			leastIndexs[0] = i; // Reset 重新记录最小活跃数的下标
			totalWeight = weight; // Reset 重新累计总权重
			firstWeight = weight; // Record the weight the first invoker 记录第一个权重
			sameWeight = true; // Reset, every invoker has the same weight value? 还原权重相等标识
		} else if (active == leastActive) { // If current invoker's active value equals with leaseActive, then accumulating. 如果活跃数相等
			leastIndexs[leastCount++] = i; // Record index number of this invoker 累计
			totalWeight += weight; // Add this invoker's weight to totalWeight. 累计
			// If every invoker has the same weight? 判断所有权重是否相同
			if (sameWeight && i > 0
					&& weight != firstWeight) {
				sameWeight = false;
			}
		}
	}
	// assert(leastCount > 0)
	if (leastCount == 1) {
		// If we got exactly one invoker having the least active value, return this invoker directly.
		// 如果只有一个最小活跃数的就直接返回
		return invokers.get(leastIndexs[0]);
	}
	if (!sameWeight && totalWeight > 0) {
		// If (not every invoker has the same weight & at least one invoker's weight>0), select randomly based on totalWeight.
		// 权重不同,且总权重大于0,和RandomLoadBalance一样按总权重随机
		int offsetWeight = random.nextInt(totalWeight);
		// Return a invoker based on the random value.
		for (int i = 0; i < leastCount; i++) {
			int leastIndex = leastIndexs[i];
			offsetWeight -= getWeight(invokers.get(leastIndex), invocation);
			if (offsetWeight <= 0)
				return invokers.get(leastIndex);
		}
	}
	// If all invokers have the same weight value or totalWeight=0, return evenly.
	// 权重相同,和RandomLoadBalance一样均等随机获取
	return invokers.get(leastIndexs[random.nextInt(leastCount)]);
}
4、最后看下ConsistentHashLoadBalance:consistenthash,一致性Hash负载均衡涉及到两个主要的配置参数为hash.arguments与hash.nodes,hash.arguments表示当进行调用时候根据调用方法的哪几个参数生成key,并根据key来通过一致性hash算法来选择调用结点;hash.nodes表示结点的副本数:
private final ConcurrentMap<String, ConsistentHashSelector<?>> selectors = new ConcurrentHashMap<String, ConsistentHashSelector<?>>();

protected <T> Invoker<T> doSelect(List<Invoker<T>> invokers, URL url, Invocation invocation) {
	String methodName = RpcUtils.getMethodName(invocation);
	// 获取调用方法全称
	String key = invokers.get(0).getUrl().getServiceKey() + "." + methodName;
	// 生成调用列表的hashcode
	int identityHashCode = System.identityHashCode(invokers);
	// 根据方法名key获取一致性hash选择器,内部类ConsistentHashSelector
	ConsistentHashSelector<T> selector = (ConsistentHashSelector<T>) selectors.get(key);
	if (selector == null || selector.identityHashCode != identityHashCode) {
		selectors.put(key, new ConsistentHashSelector<T>(invokers, methodName, identityHashCode));
		selector = (ConsistentHashSelector<T>) selectors.get(key);
	}
	// 选择节点
	return selector.select(invocation);
}

private static final class ConsistentHashSelector<T> {
	// 虚拟节点
	private final TreeMap<Long, Invoker<T>> virtualInvokers;
	// 副本数
	private final int replicaNumber;
	// 调用节点的hashcode,用于判断加入selector选择器时是否重复
	private final int identityHashCode;
	// 参数索引数组
	private final int[] argumentIndex;

	ConsistentHashSelector(List<Invoker<T>> invokers, String methodName, int identityHashCode) {
		this.virtualInvokers = new TreeMap<Long, Invoker<T>>();
		this.identityHashCode = identityHashCode;
		URL url = invokers.get(0).getUrl();
		// 获取所配置的虚拟节点数,默认为160个
		this.replicaNumber = url.getMethodParameter(methodName, "hash.nodes", 160);
		// 截取hash.arguments,获取参数
		String[] index = Constants.COMMA_SPLIT_PATTERN.split(url.getMethodParameter(methodName, "hash.arguments", "0"));
		argumentIndex = new int[index.length];
		for (int i = 0; i < index.length; i++) {
			argumentIndex[i] = Integer.parseInt(index[i]);
		}
		// 创建虚拟节点,对每一个Invoker生成replicaNumber个虚拟节点并存放于virtualInvokers中
		for (Invoker<T> invoker : invokers) {
			String address = invoker.getUrl().getAddress();
			for (int i = 0; i < replicaNumber / 4; i++) {
				byte[] digest = md5(address + i);
				for (int h = 0; h < 4; h++) {
					long m = hash(digest, h);
					virtualInvokers.put(m, invoker);
				}
			}
		}
	}

	public Invoker<T> select(Invocation invocation) {
		// 获取参数
		String key = toKey(invocation.getArguments());
		byte[] digest = md5(key);
		// 返回虚拟节点中对应hash值的Invoker
		return selectForKey(hash(digest, 0));
	}

	// ...
}
5、我们还可以自定义负载均衡策略,只需要实现LoadBalance接口或AbstractLoadBalance抽象类,然后将该类放入dubbo可发现的扩展点即可,比如:
1、实现类
public class XxxLoadBalance implements LoadBalance {
    public <T> Invoker<T> select(List<Invoker<T>> invokers, Invocation invocation) throws RpcException {
        // ...
    }
}

2、在META-INF/dubbo/org.apache.dubbo.rpc.cluster.LoadBalance文本文件写入:
xxx=com.xxx.XxxLoadBalance

3、扩展配置
<dubbo:protocol loadbalance="xxx" />
<!-- 缺省值设置,当<dubbo:protocol>没有配置loadbalance时,使用此配置 -->
<dubbo:provider loadbalance="xxx" />
分流
在流量达到一定程度的时候,或者机器性能不等的时候,就可以使用负载均衡进行分流:
1、可以修改消费者引用的远程服务负载均衡策略,比如使用注解@Reference(loadbalance="roundrobin")将随机改为轮询
2、在监控中心动态调整权重,或者在服务提供者的服务上添加权重的注解@Service(weight=200)(写死)
集群容错
在集群调用失败时,dubbo提供了多种容错方案,缺省为failover重试:
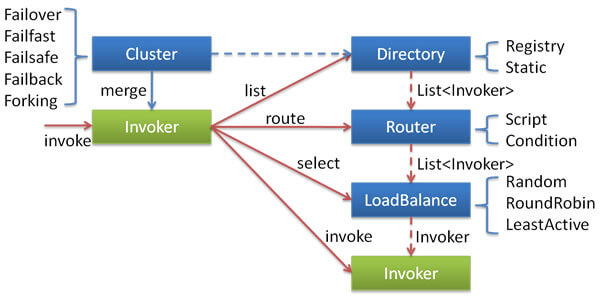 各节点关系:
1、Invoker:是Provider的一个可调用Service的抽象,Invoker封装了Provider地址及Service接口信息
2、Directory:代表多个Invoker,可以把它看成List<Invoker>,但与List不同的是,它的值可能是动态变化的,比如注册中心推送变更
3、Cluster:将Directory中的多个Invoker伪装成一个Invoker,对上层透明,伪装过程包含了容错逻辑,调用失败后,重试另一个
4、Router:负责从多个Invoker中按路由规则选出子集,比如读写分离,应用隔离等
5、LoadBalance:负责从多个Invoker中选出具体的一个用于本次调用,选的过程包含了负载均衡算法,调用失败后,需要重选
都实现了Cluster接口
1、Failover Cluster(FailoverCluster:failover):
)> 失败自动切换,当出现失败时重试其它服务器(缺省)。通常用于读操作,但重试会带来更长延迟。可通过retries="2"来设置重试次数(不含第一次)
2、Failfast Cluster(FailfastCluster:failfast):
)> 快速失败,只发起一次调用,失败后立即报错。通常用于非幂等性的写操作,比如新增记录
3、Failsafe Cluster(FailsafeCluster:failsafe):
)> 失败安全,出现异常时直接忽略。通常用于写入日志等操作
4、Failback Cluster(FailbackCluster:failback):
)> 失败自动恢复,后台记录失败请求,定时重发。通常用于消息通知操作
5、Forking Cluster(ForkingCluster:forking):
)> 并行调用多个服务器,只要一个成功即返回。通常用于实时性要求较高的读操作,但需要浪费更多服务资源。可通过forks="2"来设置最大并行数
6、Broadcast Cluster(AvailableCluster:available):
)> 广播调用所有提供者,逐个调用,任意一台报错则报错。通常用于通知所有提供者更新缓存或日志等本地资源信息
集群模式配置方式:
<dubbo:service cluster="failsafe" />

<dubbo:reference cluster="failsafe" />
同负载均衡一样,如果要自定义扩展,只要实现Cluster接口,在META-INF/dubbo/org.apache.dubbo.rpc.cluster.Cluster中定义,在配置中选择定义的集群模式即可
服务分组与版本号
在dubbo中接口类并不能唯一确定一个服务,而是接口 + 服务分组 + 版本号才能唯一确定一个服务
当一个接口有多种实现时,可以用group区分:
服务:
<dubbo:service group="feedback" interface="com.xxx.IndexService" />
<dubbo:service group="member" interface="com.xxx.IndexService" />

消费:
<dubbo:reference id="feedbackIndexService" group="feedback" interface="com.xxx.IndexService" />
<dubbo:reference id="memberIndexService" group="member" interface="com.xxx.IndexService" />
任意组:
<dubbo:reference id="barService" interface="com.foo.BarService" group="*" />
当一个接口实现,出现不兼容升级时,可以用版本号过渡,版本号不同的服务相互间不引用:
<dubbo:service interface="com.alibaba.dubbo.demo.DemoService" ref="demoService1" version="1.0.0" />
<dubbo:service interface="com.alibaba.dubbo.demo.DemoService" ref="demoService2" version="2.0.0" />
利用该特性,比如可以实现灰度发布,同时提供旧接口1.0.0版本和新接口2.0.0版本的服务,而客户端定义version="*",这样新旧接口实现各承担50%的流量
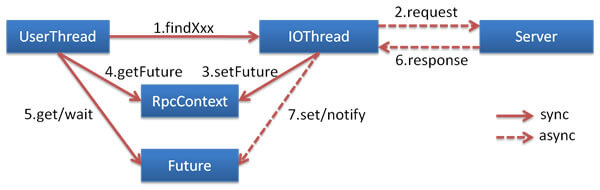
异步
Dubbo的所有异步编程接口开始以CompletableFuture为基础,基于NIO的非阻塞实现并行调用,客户端不需要启动多线程即可完成并行调用多个远程服务,相对多线程开销较小
Provider服务端异步
Provider端异步执行将阻塞的业务从Dubbo内部线程池切换到业务自定义线程,避免Dubbo线程池的过度占用,有助于避免不同服务间的互相影响。异步执行无益于节省资源或提升RPC响应性能,因为如果业务执行需要阻塞,则始终还是要有线程来负责执行
注意:Provider端异步执行和Consumer端异步调用是相互独立的,可以任意正交组合两端配置
1、方式一:定义CompletableFuture签名的接口和实现:
public interface AsyncService {
    CompletableFuture<String> sayHello(String name);
}

public class AsyncServiceImpl implements AsyncService {
    public CompletableFuture<String> sayHello(String name) {
		// 通过return CompletableFuture.supplyAsync(),业务执行已从Dubbo线程切换到业务线程,避免了对Dubbo线程池的阻塞
        // 建议为supplyAsync提供自定义线程池,避免使用JDK公用线程池
        return CompletableFuture.supplyAsync(() -> {
            try {
                Thread.sleep(5000);
            } catch (InterruptedException e) {
                e.printStackTrace();
            }
            return "async response from provider.";
        });
    }
}
2、方式二:使用AsyncContext:
// Dubbo提供了一个类似Serverlet 3.0的异步接口AsyncContext,在没有CompletableFuture签名接口的情况下,也可以实现Provider端的异步执行
public interface AsyncService {
    String sayHello(String name);
}

public class AsyncServiceImpl implements AsyncService {
    public String sayHello(String name) {
        final AsyncContext asyncContext = RpcContext.startAsync();
        new Thread(() -> {
            // 如果要使用上下文,则必须要放在第一句执行
            asyncContext.signalContextSwitch();
            try {
                Thread.sleep(500);
            } catch (InterruptedException e) {
                e.printStackTrace();
            }
            // 写回响应
            asyncContext.write("Hello " + name + ", response from provider.");
        }).start();
        return null;
    }
}
Consumer消费端异步
1、方式一:使用CompletableFuture签名的接口,调用远程服务:
// 调用直接返回CompletableFuture
CompletableFuture<String> future = asyncService.sayHello("async call request");
// 增加回调
future.whenComplete((v, t) -> {
    if (t != null) {
        t.printStackTrace();
    } else {
        System.out.println("Response: " + v);
    }
});
// 这将早于结果输出
System.out.println("Executed before response return.");
2、方式二:使用RpcContext:
需要额外配置async
<dubbo:reference id="asyncService" interface="org.apache.dubbo.samples.governance.api.AsyncService">
      <dubbo:method name="sayHello" async="true" />
</dubbo:reference>

调用远程服务:
// 此调用会立即返回null
asyncService.sayHello("world");
// 拿到调用的Future引用,当结果返回后,会被通知和设置到此Future
CompletableFuture<String> helloFuture = RpcContext.getContext().getCompletableFuture();
// 为Future添加回调
helloFuture.whenComplete((retValue, exception) -> {
    if (exception == null) {
        System.out.println(retValue);
    } else {
        exception.printStackTrace();
    }
});

或者

CompletableFuture<String> future = RpcContext.getContext().asyncCall(
    () -> {
        asyncService.sayHello("oneway call request1");
    }
);
future.get();
3、方式三:如果只有同步服务定义,而又不喜欢RpcContext的异步使用方式,可以利用Java8提供的default接口实现,重载一个带有带有CompletableFuture签名的方法,可参考官方示例
上下文与隐式参数
上下文中存放的是当前调用过程中所需的环境信息,所有配置信息都将转换为URL的参数。RpcContext是一个ThreadLocal的临时状态记录器,当接收到请求或发起请求时,RpcContext的状态都会变化,可以通过RpcContext.getContext()获取到
使用RpcContext的setAttachment()和getAttachment()方法可以在Consumer和Provider之间进行参数的隐式传递,在设置KV对后,完成一次远程调用就会被清空,即多次远程调用要多次设置
任务追踪
随着微服务架构的流行,一次请求往往需要涉及到多个服务,因此服务性能监控和排查就变得更复杂:
1、不同的服务可能由不同的团队开发、甚至可能使用不同的编程语言来实现
2、服务有可能布在了几千台服务器,横跨多个不同的数据中心
因此,就需要一些可以帮助理解系统行为、用于分析性能问题的工具,以便发生故障的时候,能够快速定位和解决问题,这就是APM系统,全称是(Application Performance Monitor,当然也有叫 Application Performance Management tools)
traceId透传
在微服务的趋势下,一次调用产生的日志分布在不同的机器上,虽然可以使用ELK的技术,将所有服务的日志写入es中,但是如何将这写日志“串起来”是一个关键问题。一般的做法是在系统的边界生成一个traceId,向调用链上的后继服务传递traceId,后继服务使用traceId打印相应日志,并再向后继服务传递traceId,简称“traceId透传”
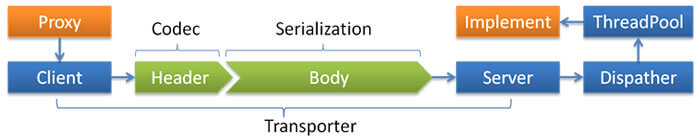 Proxy是dubbo使用javassist为consumer端service生成的动态代理instance,Implement是provider端的service实现instance。traceId透传即要求Proxy和Implement具有相同的traceId。dubbo具有良好的分层特征,transport的对象是RPCInvocation。所以Proxy将traceId放入RPCInvocation,交由Client进行序列化和TCP传输,Server反序列化得到RPCInvocation,取出traceId,交由Implement即可
生成Service代理的字节码里的每个方法的实现,都调用了InvokerInvocationHandler这个handler,做实际的RpcInvocation包装、序列化、TCP传输、反序列化结果。所以真正调用RPC的时候,各个Service的代理字节码里调用了InvokerInvocationHandler的invoke方法,参数为proxy即之前生成的代理,方法名和实际调用的参数列表。这样知道了哪个接口、哪个方法和什么参数,就完全可以映射到Provider端的实现并获取返回值
// JavassistProxyFactory
public <T> T getProxy(Invoker<T> invoker, Class<?>[] interfaces) {
	return (T) Proxy.getProxy(interfaces).newInstance(new InvokerInvocationHandler(invoker));
}


// InvokerInvocationHandler
public Object invoke(Object proxy, Method method, Object[] args) throws Throwable {
	String methodName = method.getName();
	Class<?>[] parameterTypes = method.getParameterTypes();
	if (method.getDeclaringClass() == Object.class) {
		return method.invoke(invoker, args);
	}
	if ("toString".equals(methodName) && parameterTypes.length == 0) {
		return invoker.toString();
	}
	if ("hashCode".equals(methodName) && parameterTypes.length == 0) {
		return invoker.hashCode();
	}
	if ("equals".equals(methodName) && parameterTypes.length == 1) {
		return invoker.equals(args[0]);
	}

	RpcInvocation invocation;
	if (RpcUtils.hasGeneratedFuture(method)) {
		Class<?> clazz = method.getDeclaringClass();
		String syncMethodName = methodName.substring(0, methodName.length() - Constants.ASYNC_SUFFIX.length());
		Method syncMethod = clazz.getMethod(syncMethodName, method.getParameterTypes());
		invocation = new RpcInvocation(syncMethod, args);
		invocation.setAttachment(Constants.FUTURE_GENERATED_KEY, "true");
		invocation.setAttachment(Constants.ASYNC_KEY, "true");
	} else {
		invocation = new RpcInvocation(method, args);
		if (RpcUtils.hasFutureReturnType(method)) {
			invocation.setAttachment(Constants.FUTURE_RETURNTYPE_KEY, "true");
			invocation.setAttachment(Constants.ASYNC_KEY, "true");
		}
	}
	// ----> 这里还是consumer的业务线程,所以在这里读取ThreadLocal里的traceId,再放入RpcInvocation的attachment
	// 那么Provider端就可以从收到的RpcInvocation取出透传的traceId
	return invoker.invoke(invocation).recreate();
}
服务端收到请求后,从线程池取出一个线程,反序列化出RpcInvocation,并调用实现类对应的方法
// DubboProtocol
private ExchangeHandler requestHandler = new ExchangeHandlerAdapter() {
	@Override
	public CompletableFuture<Object> reply(ExchangeChannel channel, Object message) throws RemotingException {
		if (message instanceof Invocation) {
			Invocation inv = (Invocation) message;
			Invoker<?> invoker = getInvoker(channel, inv);
			// need to consider backward-compatibility if it's a callback
			if (Boolean.TRUE.toString().equals(inv.getAttachments().get(IS_CALLBACK_SERVICE_INVOKE))) {
				String methodsStr = invoker.getUrl().getParameters().get("methods");
				boolean hasMethod = false;
				if (methodsStr == null || !methodsStr.contains(",")) {
					hasMethod = inv.getMethodName().equals(methodsStr);
				} else {
					String[] methods = methodsStr.split(",");
					for (String method : methods) {
						if (inv.getMethodName().equals(method)) {
							hasMethod = true;
							break;
						}
					}
				}
				if (!hasMethod) {
					logger.warn(new IllegalStateException("The methodName " + inv.getMethodName()
							+ " not found in callback service interface ,invoke will be ignored."
							+ " please update the api interface. url is:"
							+ invoker.getUrl()) + " ,invocation is :" + inv);
					return null;
				}
			}
			RpcContext rpcContext = RpcContext.getContext();
			boolean supportServerAsync = invoker.getUrl().getMethodParameter(inv.getMethodName(), Constants.ASYNC_KEY, false);
			if (supportServerAsync) {
				CompletableFuture<Object> future = new CompletableFuture<>();
				rpcContext.setAsyncContext(new AsyncContextImpl(future));
			}
			rpcContext.setRemoteAddress(channel.getRemoteAddress());
			// ----> 这里是Provider端的实现类的线程中,可以在inv这里取出traceId放入ThreadLocal
			Result result = invoker.invoke(inv);

			if (result instanceof AsyncRpcResult) {
				return ((AsyncRpcResult) result).getResultFuture().thenApply(r -> (Object) r);
			} else {
				return CompletableFuture.completedFuture(result);
			}
		}
		throw new RemotingException(channel, "Unsupported request: "
				+ (message == null ? null : (message.getClass().getName() + ": " + message))
				+ ", channel: consumer: " + channel.getRemoteAddress() + " --> provider: " + channel.getLocalAddress());
	}

	// ...
};
以上是实现的一种方式。实际上我们会用dubbo提供的隐式传递,而不需要修改dubbo实现。在服务端和消费端分别定义两个Filter:
@Activate(group = Constants.CONSUMER)
public TraceIdFilter implements Filter {
	public Result invoke(Invoker<?> invoker, Invocation invocation) throws RpcException {
		// 排除MonitorService等...,放入traceId(可能是传递的,也需要获取traceId)
		// String traceId = invocation.getAttachment("TRACE_ID");
		RpcContext.getContext().setAttachment("TRACE_ID", traceId);
		// ...
        return invoker.invoke(invocation);
    }
}

@Activate(group = Constants.PROVIDER)
public TraceIdFilter implements Filter {
	public Result invoke(Invoker<?> invoker, Invocation invocation) throws RpcException {
        try {
			// 排除MonitorService等...,取得traceId
			// RpcContext.getContext().getAttachment("TRACE_ID");
			String traceId = invocation.getAttachment("TRACE_ID");
			// 可以结合slf4j或log4j的MDC/NDC 或者 log4j2的ThreadContext进行参数的注入,也可以放到ThreadLocal内自己处理
			// 还可以使用dubbo提供的NetUtils获取host、ip等信息...
			return invoker.invoke(invocation);
		} finally {
            // 做一些清理工作,比如ThreadContext.remove(traceId) 或 MDC.remove(traceId)
        }
    }
}
那么为什么设置dubbo上下文的attachment调用时会出现在RpcInvocation中:
// AbstractInvoker
public Result invoke(Invocation inv) throws RpcException {
	// ...
	RpcInvocation invocation = (RpcInvocation) inv;
	invocation.setInvoker(this);
	if (attachment != null && attachment.size() > 0) {
		invocation.addAttachmentsIfAbsent(attachment);
	}
	Map<String, String> contextAttachments = RpcContext.getContext().getAttachments();
	if (contextAttachments != null && contextAttachments.size() != 0) {
		/**
		 * invocation.addAttachmentsIfAbsent(context){@link RpcInvocation#addAttachmentsIfAbsent(Map)}should not be used here,
		 * because the {@link RpcContext#setAttachment(String, String)} is passed in the Filter when the call is triggered
		 * by the built-in retry mechanism of the Dubbo. The attachment to update RpcContext will no longer work, which is
		 * a mistake in most cases (for example, through Filter to RpcContext output traceId and spanId and other information).
		 */
		invocation.addAttachments(contextAttachments);
	}
	// ...
	try {
		return doInvoke(invocation);
	} // ...
}
因为使用了@Activate注解,所以dubbo会自动加载而不需要显示的配置provider或者consumer的filter。这是因为ProtocolFilterWrapper中会调用ExtensionLoader的getActivateExtension方法。然而如果需要显示加载可以:
在META-INF/dubbo/com.alibaba.dubbo.rpc.Filter文本文件中写入:
traceIdFilter=com.test.TraceIdFilter

<dubbo:consumer filter="traceIdFilter" />
<dubbo:provider filter="traceIdFilter" />

关闭filter的加载:
<dubbo:consumer filter="-traceIdFilter" />

除了注解定义order外重定义filter链顺序:
<dubbo:reference filter="filter1,filter2"/>
<dubbo:reference filter="filter1,filter2,default"/>
<dubbo:service filter="filter1,default,filter2,-traceIdFilter"/>
自己实现的方式非常简单,能够在日志中体现,但是没有UI界面提供我们方便查看链路,所以可以使用第三方提供UI
Zipkin + Brave
上一家公司在用Zipkin,所以用过下后台,体验还是挺好的
Zipkin是一个分布式追踪系统,它会帮助我们按照时间的顺序有规则的去收集数据,并且帮我们管理数据和查询有用的数据,Zipkin是根据Google的论文Dapper设计的。Zipkin目的是用来记录应用程序的时间数据日记的,Zipkin UI还提供了一个系统之间的调用依赖图来向我们展示各个系统之间的请求链路关系,可以使用Zipkin UI来过滤,排序,通过这样的方式去排查问题,可以清晰的看见整个调用过程的链路长度,注释,时间戳,当你选择一条出问题的具体链路,可以清晰的看见每个调用段占整个调用段的时间占比,这样就能够帮助你找到问题链路或者超时链路
简单思路也是实现dubbo Filter,使用相关API实现invoke逻辑
github: openzipkin/zipkin
Basic example showing distributed tracing across Spring Boot apps
Brave是Java程序的类库,可以通过编写简单的配置和代码,向Zipkin报告数据。同时Brave也提供了非常简单且标准化的接口,在封装无法满足要求的时候可以方定制便与扩展
brave-instrumentation-dubbo-rpc:github: openzipkin/brave/instrumentation/dubbo-rpc
其他
CAT
上上家公司别的组有同事玩过,需要添加埋点记录数据,但是后来没有推广,可以看看
大众点评监控平台: github: dianping/cat
Spring Cloud Sleuth
Spring Cloud Sleuth实现对Spring cloud分布式链路监控,也可以结合zipkin
github: spring-cloud/spring-cloud-sleuth
Spring Cloud Sleuth + zipkin 实现服务追踪
Pinpoint
Pinpoint是一款全链路分析工具,提供了无侵入式的调用链监控、方法执行详情查看、应用状态信息监控等功能。基于GoogleDapper论文进行的实现,与另一款开源的全链路分析工具Zipkin类似,但相比Zipkin提供了无侵入式、代码维度的监控等更多的特性,是一个APM(应用性能管理)解决方案
SkyWalking
国产的一款类似Pinpoint的工具SkyWalking,现在已经贡献到Apache了。是一款优秀的国产APM工具,包括了分布式追踪、性能指标分析、应用和服务依赖分析等。存储用的是ES,和Pinpoint用Hbase各有优劣
github: apache/incubator-skywalking
扩展:
APM 原理与框架选型
其他
线程模型:请求响应消息在IO线程上执行,或是派发到线程池中(定义一个ThreadPool)
官方:线程模型
参数验证:只需标识JSR303标准的验证annotation
官方:参数验证
延迟暴露:如果服务需要预热时间,比如初始化本地缓存,等待相关资源就位等,可以使用delay参数进行延迟暴露,使dubbo在Spring容器初始化完后延迟多少毫秒再暴露服务
参数回调:参数回调方式与调用本地callback或listener相同
官方:参数回调
事件通知:在调用之前、调用之后、出现异常时,会触发oninvoke、onreturn、onthrow三个事件,可以配置当事件发生时,通知哪个类的哪个方法
官方:事件通知
粘滞连接:用于有状态服务,尽可能让客户端总是向同一提供者发起调用,除非该提供者挂了再连另一台。粘滞连接将自动开启延迟连接,以减少长连接数,可以使用sticky="true"来开启,还支持方法级别
令牌验证:通过令牌验证在注册中心控制权限,以决定要不要下发令牌给消费者,可以防止消费者绕过注册中心访问提供者,可以使用token="true"开启随机token令牌(UUID),也可以设定固定token令牌token="123456"
官方:本地存根
官方:结果缓存
官方:配置规则
官方:路由规则,可以设定黑白名单、读写分离等,还可以使用标签路由实现流量隔离