SpringBoot(一) 启动与自动配置
SpringBoot(二) starter与servlet容器
SpringBoot(三) Environment
SpringBoot(四) 集成apollo遇到的事儿
SpringBoot(五) 健康检查(上)
SpringBoot(六) 健康检查(下)
Endpoint
启动
首先看META-INF/spring.factories配置中的WebEndpointAutoConfiguration。排除创建EndpointFilter,先看PathMapper,实际创建的是MappingWebEndpointPathMapper,这个bean里存放的是配置中的endpoint路径映射,一般不配置就是空map,如果有配置路径比如management.endpoints.web.path-mapping.health=healthcheck那么里面会存放health -> healthcheck,当创建Endpoint时会从这里取得rootPath作为访问路径
EndpointDiscoverer
而在创建PathMappedEndpoints时,会查找所有EndpointsSupplier的实现类
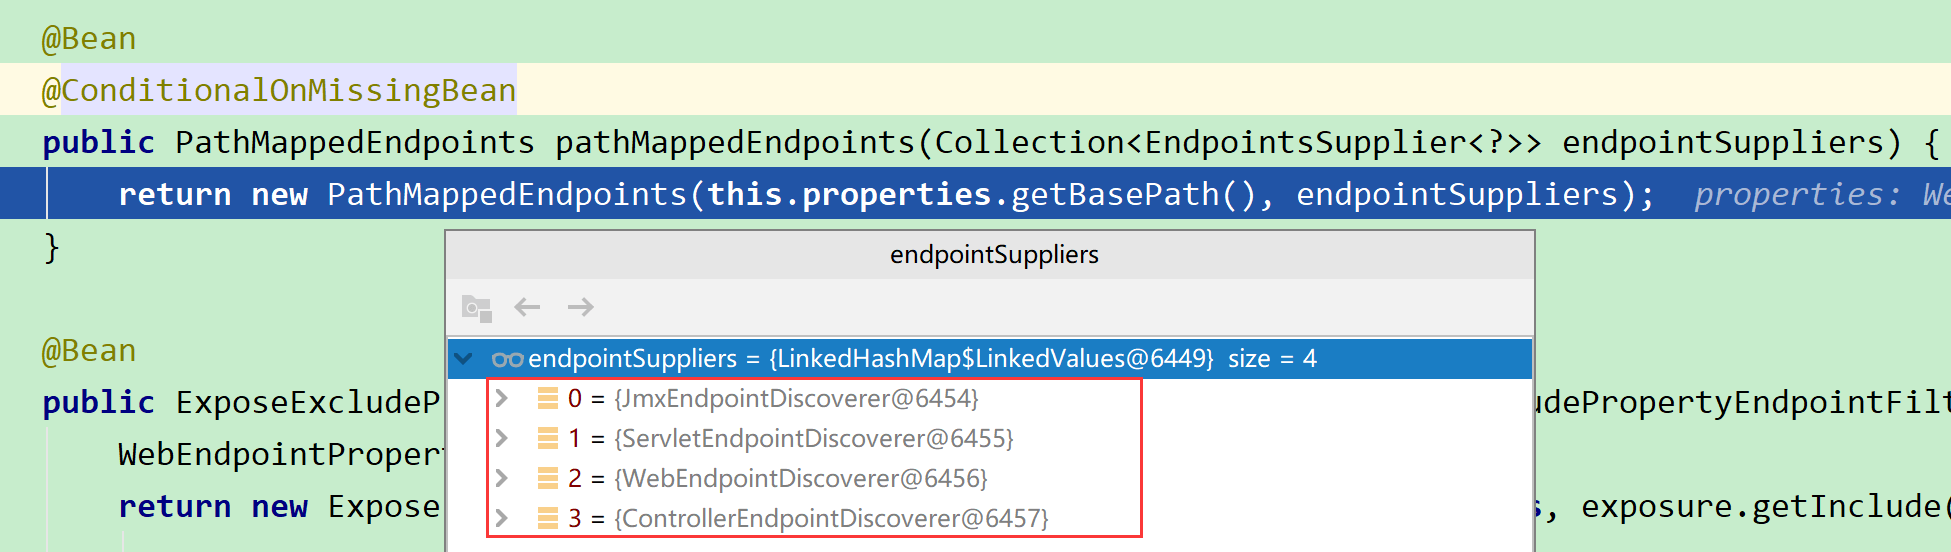
JmxEndpointDiscoverer、ServletEndpointDiscoverer、WebEndpointDiscoverer、ControllerEndpointDiscoverer分别由JmxEndpointAutoConfiguration和WebEndpointAutoConfiguration创建,然后传入构造方法:
public PathMappedEndpoints(String basePath, Collection<EndpointsSupplier<?>> suppliers) {
	Assert.notNull(suppliers, "Suppliers must not be null");
	this.basePath = (basePath != null) ? basePath : "";
	this.endpoints = getEndpoints(suppliers);
}

private Map<EndpointId, PathMappedEndpoint> getEndpoints(Collection<EndpointsSupplier<?>> suppliers) {
	Map<EndpointId, PathMappedEndpoint> endpoints = new LinkedHashMap<>();
	suppliers.forEach((supplier) -> {
		supplier.getEndpoints().forEach((endpoint) -> {
			if (endpoint instanceof PathMappedEndpoint) {
				endpoints.put(endpoint.getEndpointId(), (PathMappedEndpoint) endpoint);
			}
		});
	});
	return Collections.unmodifiableMap(endpoints);
}
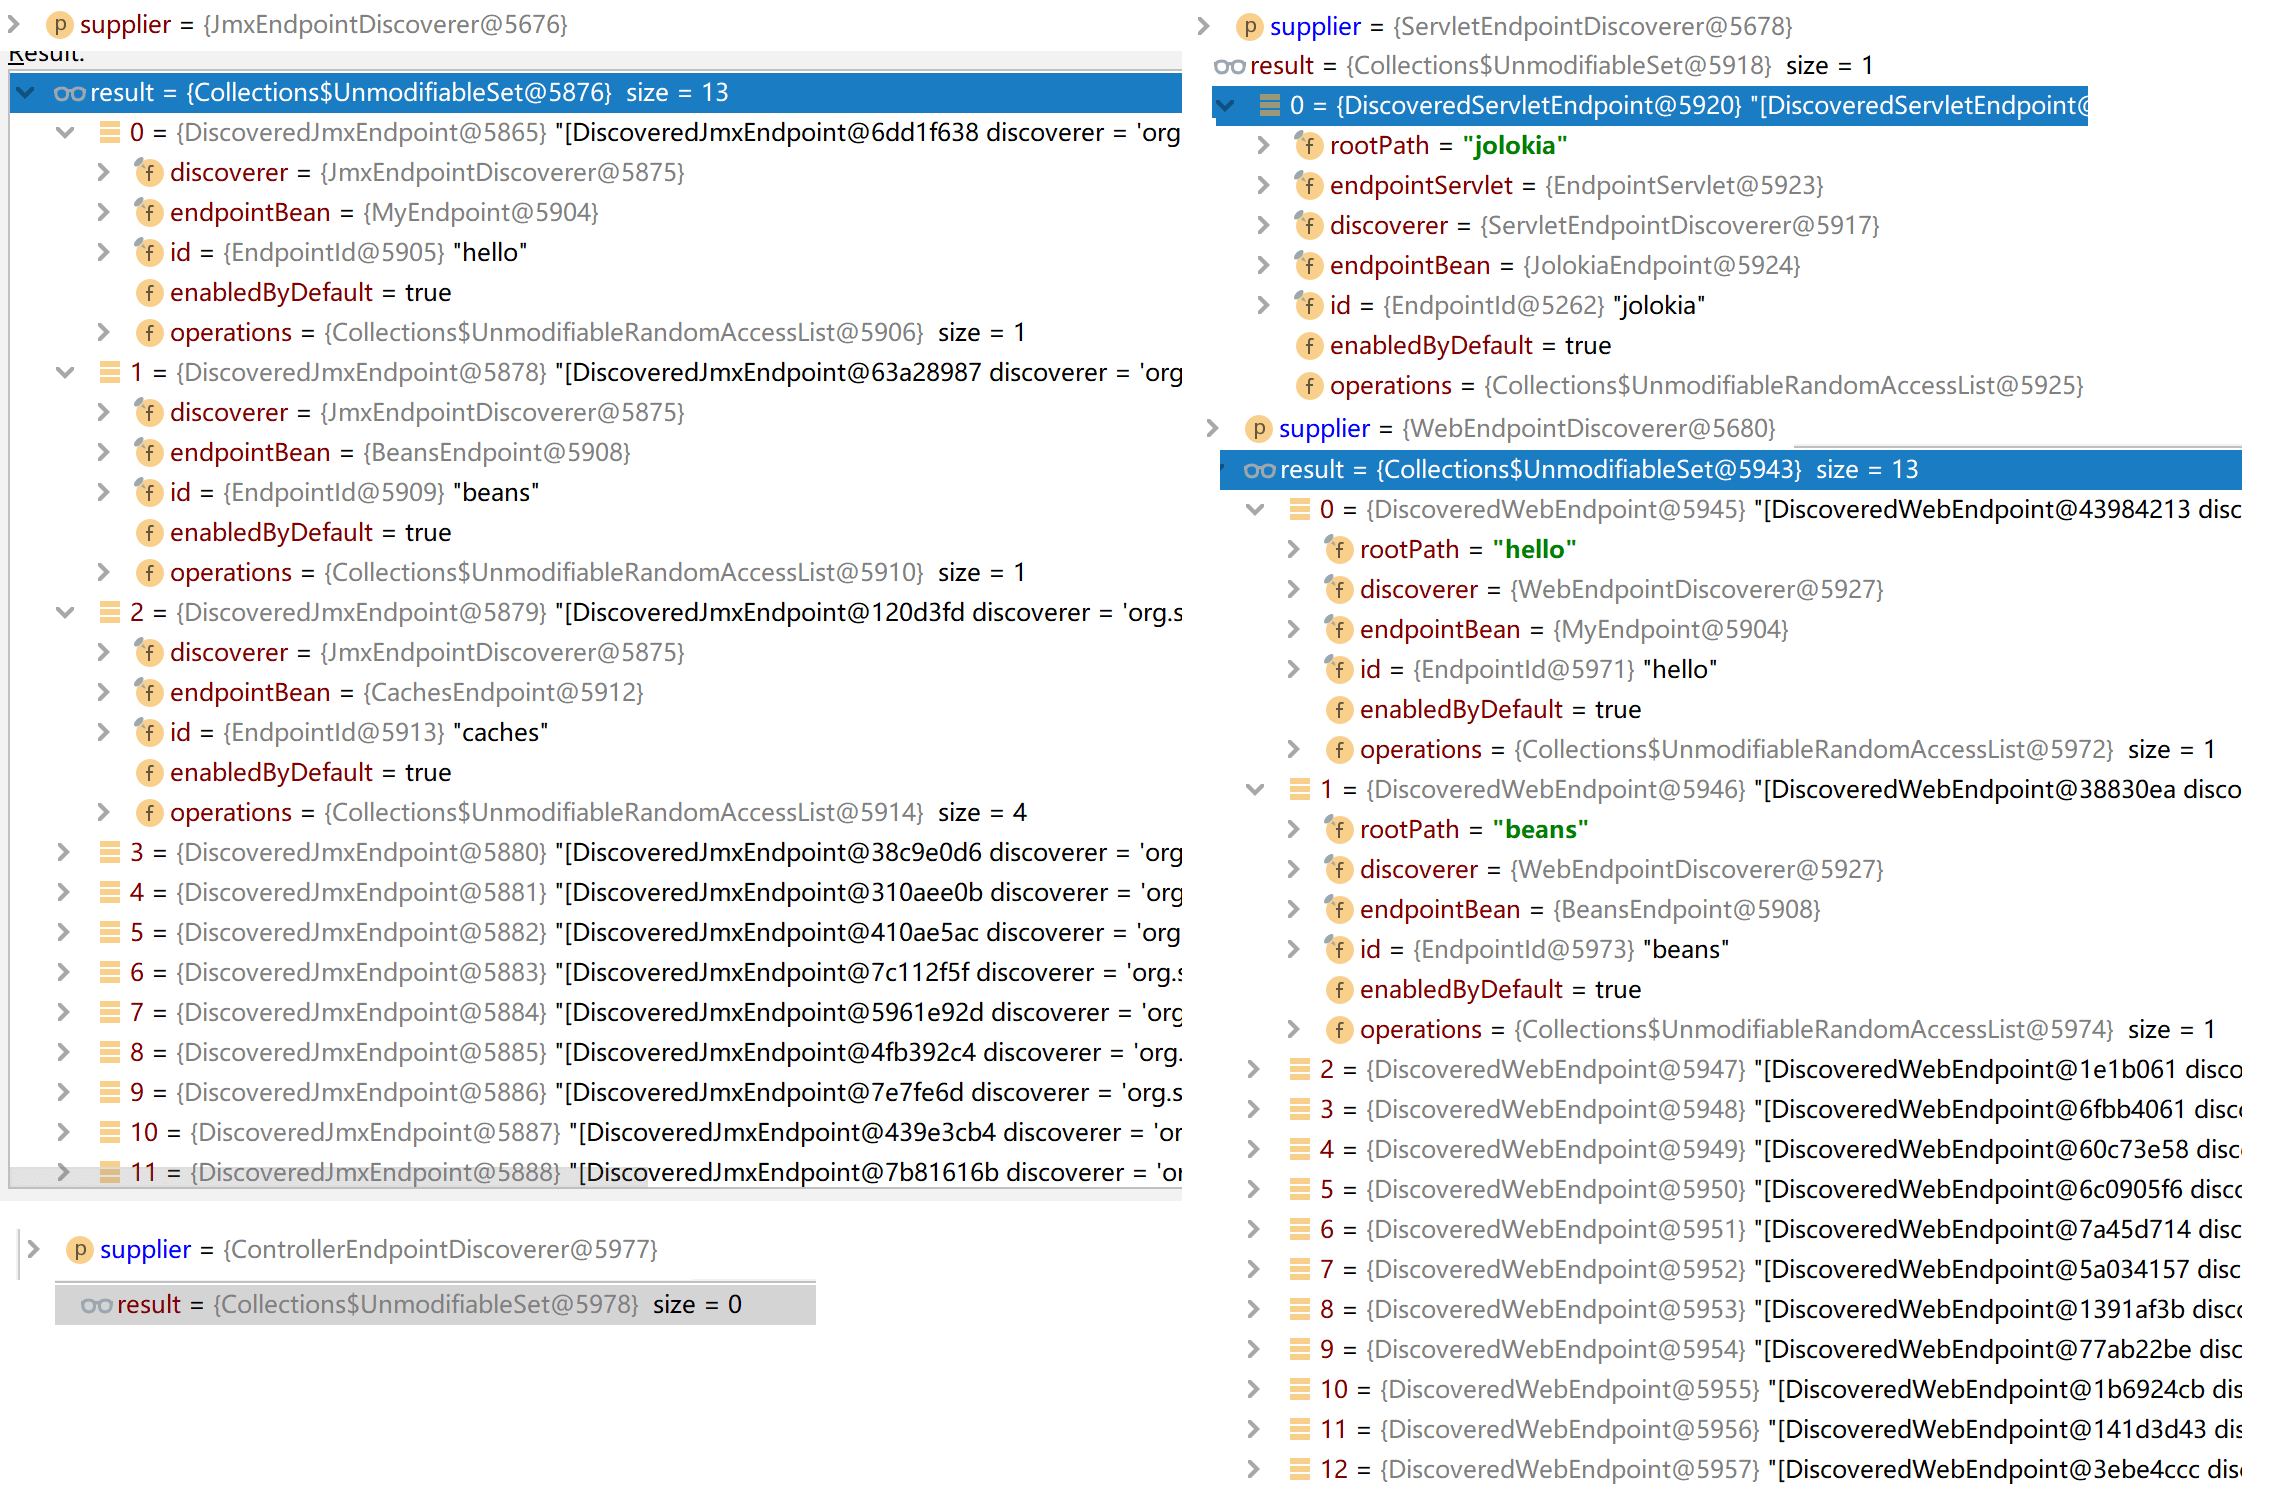
重要的就是这个getEndpoints方法,它遍历这些EndpointDiscoverer去getEndpoints,然后将PathMappedEndpoint的实现(可映射到web根路径的ExposableEndpoint)存入属性
// EndpointDiscoverer
public final Collection<E> getEndpoints() {
	if (this.endpoints == null) {
		this.endpoints = discoverEndpoints();
	}
	return this.endpoints;
}
这里endpoints已经被创建过了,ServletEndpointDiscoverer和JmxEndpointDiscoverer会在创建ServletEndpointRegistrar、JmxEndpointExporter的时候调用,即第一次进入后调用discoverEndpoints方法:
private Collection<E> discoverEndpoints() {
	// 创建所有Endpoint
	Collection<EndpointBean> endpointBeans = createEndpointBeans();
	// 创建ExtensionBeans
	addExtensionBeans(endpointBeans);
	// 转换Exposed的Endpoints
	return convertToEndpoints(endpointBeans);
}
而WebEndpointDiscoverer、ControllerEndpointDiscoverer此时是第一次调用,因此会通过这个方法去创建EndpointExtension
EndpointHandlerMapping
那么知道PathMapper和各个Endpoint怎么创建后,就需要将他们联系在一起并注册,好让我们能在需要调用时通过地址找到他们。首先看下WebMvcEndpointHandlerMapping:
public WebMvcEndpointHandlerMapping webEndpointServletHandlerMapping(WebEndpointsSupplier webEndpointsSupplier,
		ServletEndpointsSupplier servletEndpointsSupplier, ControllerEndpointsSupplier controllerEndpointsSupplier,
		EndpointMediaTypes endpointMediaTypes, CorsEndpointProperties corsProperties,
		WebEndpointProperties webEndpointProperties, Environment environment) {
	List<ExposableEndpoint<?>> allEndpoints = new ArrayList<>();
	// 从WebEndpointDiscoverer获取
	Collection<ExposableWebEndpoint> webEndpoints = webEndpointsSupplier.getEndpoints();
	allEndpoints.addAll(webEndpoints);
	// 从ServletEndpointDiscoverer获取
	allEndpoints.addAll(servletEndpointsSupplier.getEndpoints());
	// 从ControllerEndpointDiscoverer获取
	allEndpoints.addAll(controllerEndpointsSupplier.getEndpoints());
	// 即/actuator
	String basePath = webEndpointProperties.getBasePath();
	// 创建EndpointMapping
	EndpointMapping endpointMapping = new EndpointMapping(basePath);
	boolean shouldRegisterLinksMapping = StringUtils.hasText(basePath)
			|| ManagementPortType.get(environment).equals(ManagementPortType.DIFFERENT);
	return new WebMvcEndpointHandlerMapping(endpointMapping, webEndpoints, endpointMediaTypes,
			corsProperties.toCorsConfiguration(), new EndpointLinksResolver(allEndpoints, basePath),
			shouldRegisterLinksMapping);
}
ControllerEndpointHandlerMapping也是类似,创建一个ControllerEndpointHandlerMapping:
public ControllerEndpointHandlerMapping controllerEndpointHandlerMapping(
		ControllerEndpointsSupplier controllerEndpointsSupplier, CorsEndpointProperties corsProperties,
		WebEndpointProperties webEndpointProperties) {
	EndpointMapping endpointMapping = new EndpointMapping(webEndpointProperties.getBasePath());
	return new ControllerEndpointHandlerMapping(endpointMapping, controllerEndpointsSupplier.getEndpoints(),
			corsProperties.toCorsConfiguration());
}
可以见得,这2个都是SpringMVC的HandlerMapping,都是继承自RequestMappingHandlerMapping的,正如其通过URL的调用方式,就是使用了SpringMVC。因此它们都是在WebMvcEndpointManagementContextConfiguration中进行创建的
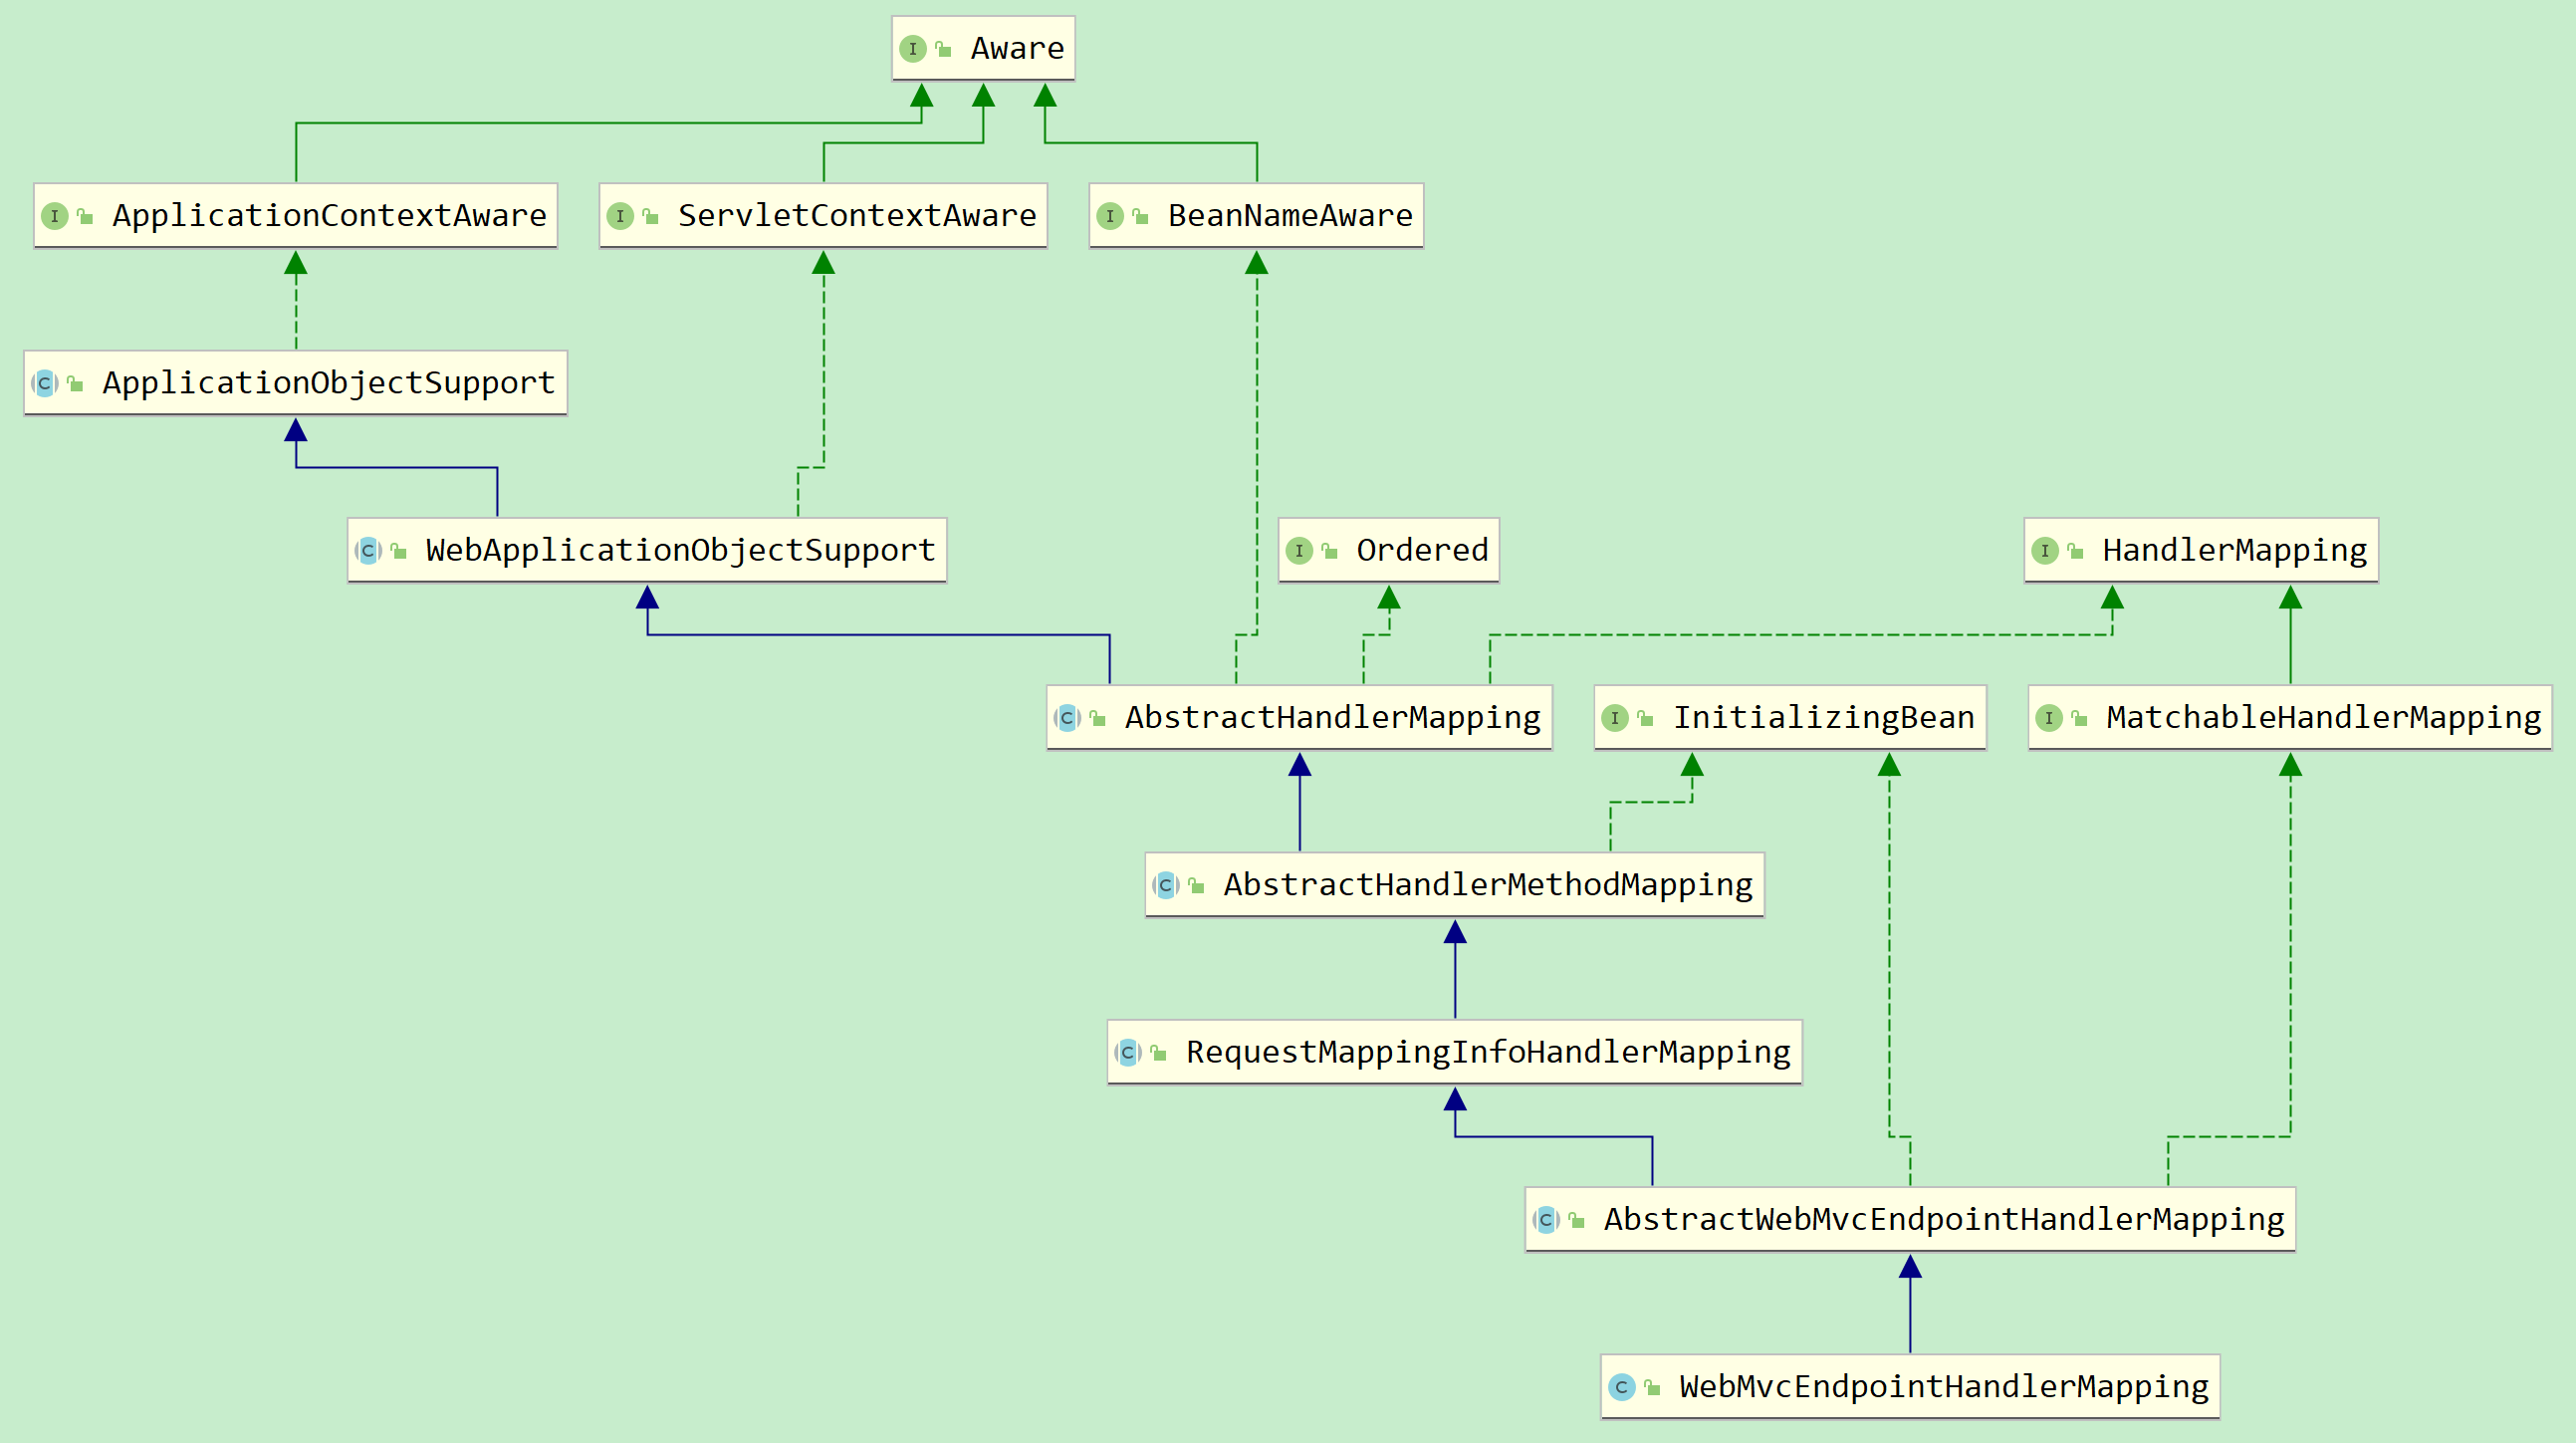 WebMvcEndpointHandlerMapping继承的AbstractHandlerMethodMapping实现了InitializingBean接口,因此会调用其afterPropertiesSet方法,其调用AbstractWebMvcEndpointHandlerMapping的方法进行注册:
public void afterPropertiesSet() {
initHandlerMethods();
}
// AbstractWebMvcEndpointHandlerMapping
protected void initHandlerMethods() {
for (ExposableWebEndpoint endpoint : this.endpoints) {
// 遍历其所有操作方法
for (WebOperation operation : endpoint.getOperations()) {
// 1.注册
registerMappingForOperation(endpoint, operation);
}
}
if (this.shouldRegisterLinksMapping) {
// 2.注册链接地址映射
registerLinksMapping();
}
}
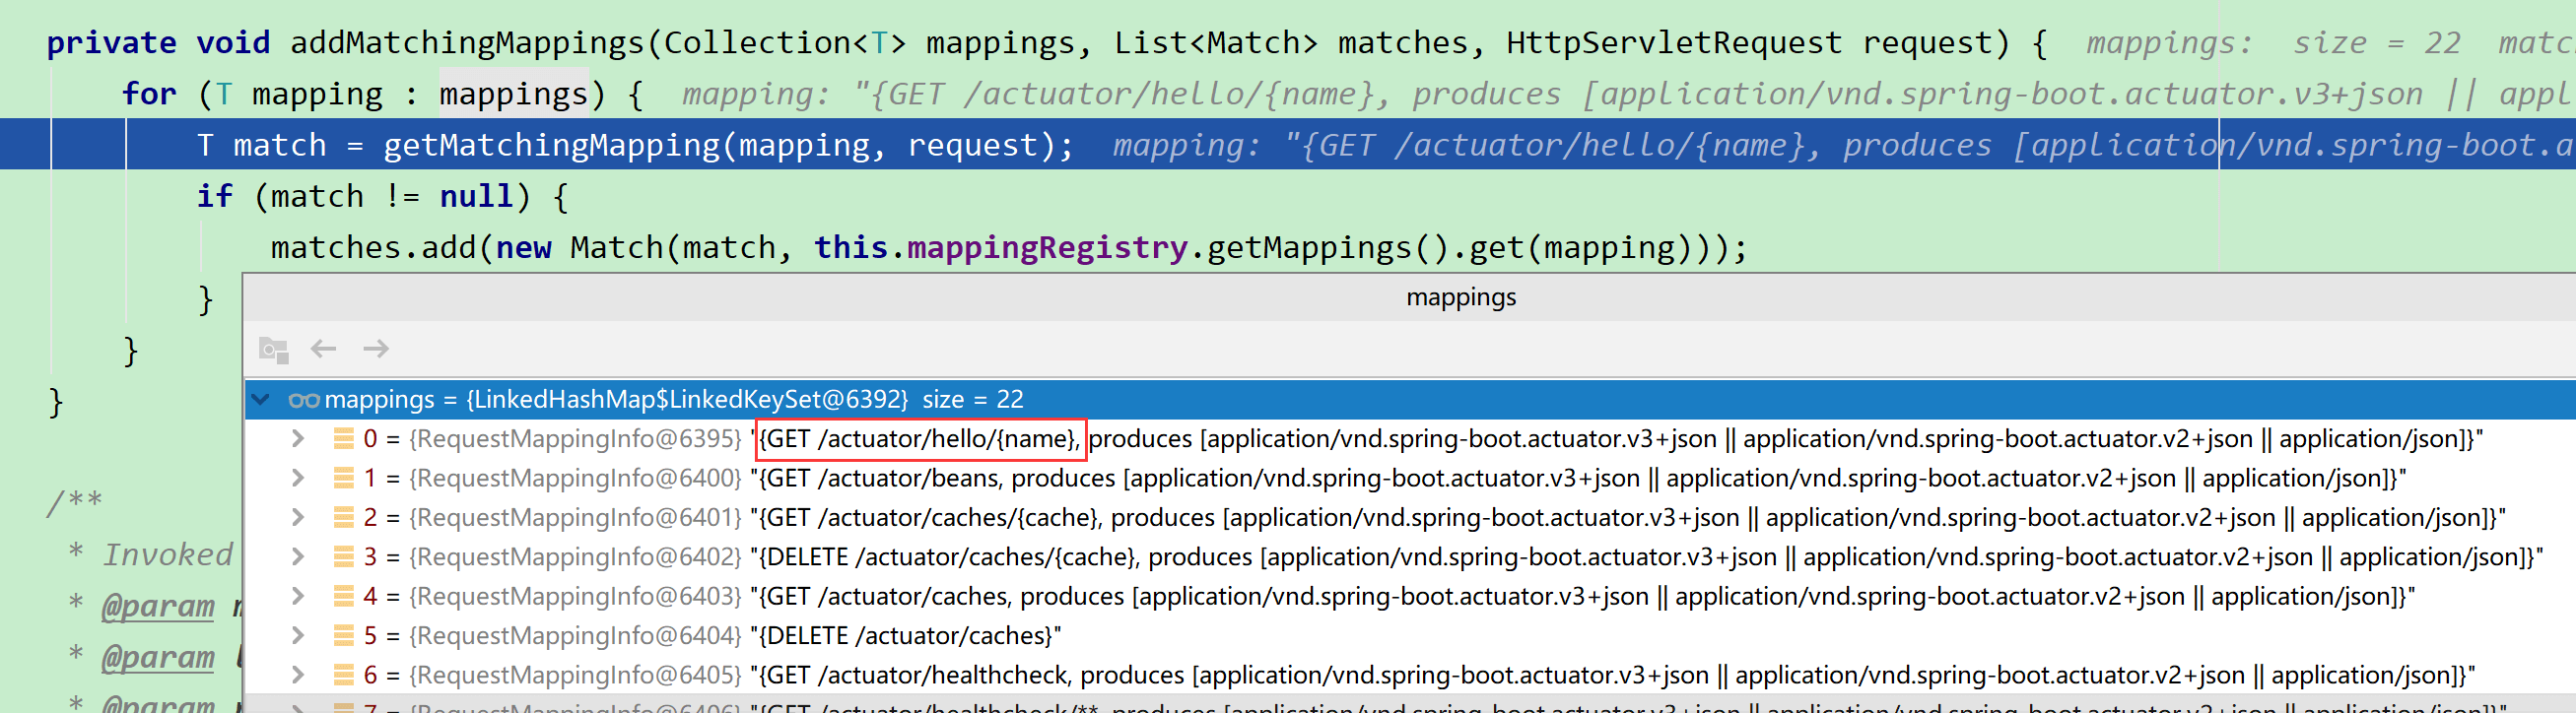
private void registerMappingForOperation(ExposableWebEndpoint endpoint, WebOperation operation) {
// 请求阐明
WebOperationRequestPredicate predicate = operation.getRequestPredicate();
// 获取请求地址,例如:hello/{name}
String path = predicate.getPath();
// 获取所有路径变量名
String matchAllRemainingPathSegmentsVariable = predicate.getMatchAllRemainingPathSegmentsVariable();
if (matchAllRemainingPathSegmentsVariable != null) {
path = path.replace("{*" + matchAllRemainingPathSegmentsVariable + "}", "**");
}
// ServletWebOperationAdapter,封装WebOperation
ServletWebOperation servletWebOperation = wrapServletWebOperation(endpoint, operation,
new ServletWebOperationAdapter(operation));
registerMapping(createRequestMappingInfo(predicate, path), new OperationHandler(servletWebOperation),
this.handleMethod);
}
private void registerLinksMapping() {
// [/actuator]
PatternsRequestCondition patterns = patternsRequestConditionForPattern("");
// [GET]
RequestMethodsRequestCondition methods = new RequestMethodsRequestCondition(RequestMethod.GET);
// [application/vnd.spring-boot.actuator.v3+json || application/vnd.spring-boot.actuator.v2+json || application/json]
ProducesRequestCondition produces = new ProducesRequestCondition(this.endpointMediaTypes.getProduced()
.toArray(StringUtils.toStringArray(this.endpointMediaTypes.getProduced())));
// {GET /actuator, produces [application/vnd.spring-boot.actuator.v3+json || application/vnd.spring-boot.actuator.v2+json || application/json]}
RequestMappingInfo mapping = new RequestMappingInfo(patterns, methods, null, null, null, produces, null);
LinksHandler linksHandler = getLinksHandler();
registerMapping(mapping, linksHandler, ReflectionUtils.findMethod(linksHandler.getClass(), "links",
HttpServletRequest.class, HttpServletResponse.class));
}
// 最后都调用这个方法进行注册映射到map
public void registerMapping(T mapping, Object handler, Method method) {
if (logger.isTraceEnabled()) {
logger.trace("Register \"" + mapping + "\" to " + method.toGenericString());
}
this.mappingRegistry.register(mapping, handler, method);
}
mappingRegistry是AbstractWebMvcEndpointHandlerMapping的内部类,这里将映射关系都放到map中
public void register(T mapping, Object handler, Method method) {
	// Assert that the handler method is not a suspending one.
	if (KotlinDetector.isKotlinType(method.getDeclaringClass()) && KotlinDelegate.isSuspend(method)) {
		throw new IllegalStateException("Unsupported suspending handler method detected: " + method);
	}
	this.readWriteLock.writeLock().lock();
	try {
		// WebMvcEndpointHandlerMethod
		HandlerMethod handlerMethod = createHandlerMethod(handler, method);
		validateMethodMapping(handlerMethod, mapping);
		// Map<T, HandlerMethod> mappingLookup
		this.mappingLookup.put(mapping, handlerMethod);

		List<String> directUrls = getDirectUrls(mapping);
		for (String url : directUrls) {
			this.urlLookup.add(url, mapping);
		}

		String name = null;
		if (getNamingStrategy() != null) {
			name = getNamingStrategy().getName(handlerMethod, mapping);
			// mappingLookup
			addMappingName(name, handlerMethod);
		}

		// 跨域
		CorsConfiguration corsConfig = initCorsConfiguration(handler, method, mapping);
		if (corsConfig != null) {
			this.corsLookup.put(handlerMethod, corsConfig);
		}
		// Map<T, MappingRegistration<T>> registry
		this.registry.put(mapping, new MappingRegistration<>(mapping, handlerMethod, directUrls, name));
	}
	finally {
		this.readWriteLock.writeLock().unlock();
	}
}
EndpointRegistrar
接下来看下ServletEndpointRegistrar,它是在ServletEndpointManagementContextConfiguration中被创建的:
public ServletEndpointRegistrar servletEndpointRegistrar(WebEndpointProperties properties,
		ServletEndpointsSupplier servletEndpointsSupplier, DispatcherServletPath dispatcherServletPath) {
	// /actuator  和 之前创建的
	return new ServletEndpointRegistrar(dispatcherServletPath.getRelativePath(properties.getBasePath()),
			servletEndpointsSupplier.getEndpoints());
}
而ServletEndpointRegistrar是实现了ServletContextInitializer接口,然后在TomcatStarter启动时会调用ServletContextInitializer的onStartup方法:
public void onStartup(ServletContext servletContext) throws ServletException {
	this.servletEndpoints.forEach((servletEndpoint) -> register(servletContext, servletEndpoint));
}

private void register(ServletContext servletContext, ExposableServletEndpoint endpoint) {
	String name = endpoint.getEndpointId().toLowerCaseString() + "-actuator-endpoint";
	String path = this.basePath + "/" + endpoint.getRootPath();
	String urlMapping = path.endsWith("/") ? path + "*" : path + "/*";
	EndpointServlet endpointServlet = endpoint.getEndpointServlet();
	// 使用了addServlet的方式
	Dynamic registration = servletContext.addServlet(name, endpointServlet.getServlet());
	registration.addMapping(urlMapping);
	registration.setInitParameters(endpointServlet.getInitParameters());
	registration.setLoadOnStartup(endpointServlet.getLoadOnStartup());
	logger.info("Registered '" + path + "' to " + name);
}
EndpointExporter
最后看JmxEndpointExporter,其在JmxEndpointAutoConfiguration中被创建:
public JmxEndpointExporter jmxMBeanExporter(MBeanServer mBeanServer, Environment environment,
		ObjectProvider<ObjectMapper> objectMapper, JmxEndpointsSupplier jmxEndpointsSupplier) {
	String contextId = ObjectUtils.getIdentityHexString(this.applicationContext);
	EndpointObjectNameFactory objectNameFactory = new DefaultEndpointObjectNameFactory(this.properties, environment,
			mBeanServer, contextId);
	JmxOperationResponseMapper responseMapper = new JacksonJmxOperationResponseMapper(
			objectMapper.getIfAvailable());
	return new JmxEndpointExporter(mBeanServer, objectNameFactory, responseMapper,
			jmxEndpointsSupplier.getEndpoints());
}
其实现了InitializingBean接口,因此在afterPropertiesSet中做了注册的动作:
public void afterPropertiesSet() {
	this.registered = register();
}

private Collection<ObjectName> register() {
	return this.endpoints.stream().map(this::register).collect(Collectors.toList());
}

private ObjectName register(ExposableJmxEndpoint endpoint) {
	// ...
	ObjectName name = this.objectNameFactory.getObjectName(endpoint);
	EndpointMBean mbean = new EndpointMBean(this.responseMapper, this.classLoader, endpoint);
	// 注册到MBeanServer
	this.mBeanServer.registerMBean(mbean, name);
	return name;
	// ...
}
这就是这4种类型的Endpoint注册的过程,这里省略了Endpoint过滤器EndpointFilter的分析
调用
从上面的创建可以看出,主要就是使用SpringMVC的HandlerMapping形式调用和使用JMX的MBeanServer来管理和查询,那么分别用2个具体的例子来看一下这两种方式
URL
以上篇中创建的HelloEndpoint为例,通过http://127.0.0.1:8080/actuator/hello/zz访问endpoint,显然是SpringMVC方式,我们来回顾下流程:
- 通过HttpServlet的
service()方法进入doGet方法() - 进入MVC核心类DispatcherServlet,执行
doDispatch()方法 - 获取HandlerExecutionChain,里面包含handler处理器,即AbstractWebMvcEndpointHandlerMapping$WebMvcEndpointHandlerMethod,和interceptor拦截器列表
- 获取适配器HandlerAdapter,调用
handle()方法 - 在RequestMappingHandlerAdapter中根据HandlerMethod创建ServletInvocableHandlerMethod,调用其
invokeAndHandle()方法 - 调用InvocableHandlerMethod的
doInvoke()方法,然后通过反射调用具体方法
我们看到doInvoke方法中就做了一个事情:
return this.getBridgedMethod().invoke(this.getBean(), args);
那么只要分析Method是哪个?参数getBean是什么?就可以了:
- Method是AbstractWebMvcEndpointHandlerMapping$OperationHandler#handle()方法
- getBean即创建ServletInvocableHandlerMethod的中bean参数,即入参handlerMethod.bean,为AbstractWebMvcEndpointHandlerMapping$OperationHandler
@ResponseBody
Object handle(HttpServletRequest request, @RequestBody(required = false) Map<String, String> body) {
	// AbstractWebMvcEndpointHandlerMapping$ServletWebOperationAdapter
	return this.operation.handle(request, body);
}

public Object handle(HttpServletRequest request, @RequestBody(required = false) Map<String, String> body) {
	HttpHeaders headers = new ServletServerHttpRequest(request).getHeaders();
	Map<String, Object> arguments = getArguments(request, body);
	try {
		ApiVersion apiVersion = ApiVersion.fromHttpHeaders(headers);
		ServletSecurityContext securityContext = new ServletSecurityContext(request);
		InvocationContext invocationContext = new InvocationContext(apiVersion, securityContext, arguments);
		// this.operation就是DiscoveredWebOperation,就是通过endpoint.getOperations()遍历得到的
		return handleResult(this.operation.invoke(invocationContext), HttpMethod.resolve(request.getMethod()));
	}
	catch (InvalidEndpointRequestException ex) {
		throw new BadOperationRequestException(ex.getReason());
	}
}
知道endpoint的Operation后,然后通过invoker.invoke反射执行MyEndpoint的hello方法
// AbstractDiscoveredOperation
public Object invoke(InvocationContext context) {
	return this.invoker.invoke(context);
}

那么可以看出,最重要的就是获取HandlerExecutionChain时里面的handler处理器
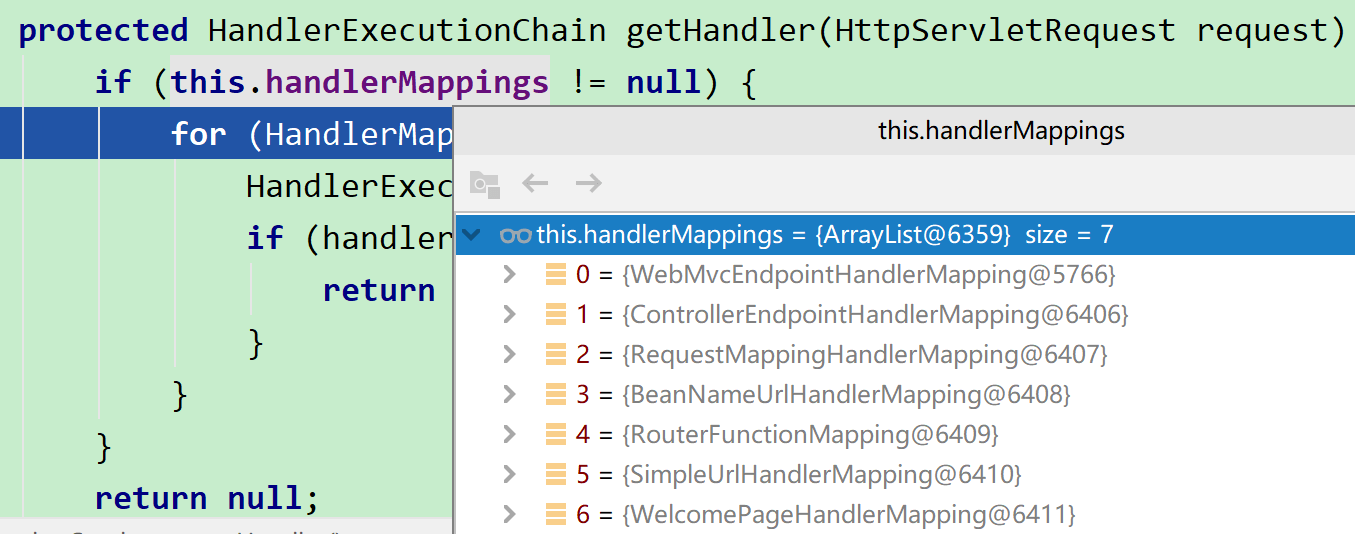
// AbstractHandlerMethodMapping
protected HandlerMethod getHandlerInternal(HttpServletRequest request) throws Exception {
	// /actuator/hello/zz
	String lookupPath = getUrlPathHelper().getLookupPathForRequest(request);
	request.setAttribute(LOOKUP_PATH, lookupPath);
	this.mappingRegistry.acquireReadLock();
	try {
		HandlerMethod handlerMethod = lookupHandlerMethod(lookupPath, request);
		return (handlerMethod != null ? handlerMethod.createWithResolvedBean() : null);
	}
	finally {
		this.mappingRegistry.releaseReadLock();
	}
}
 这里
这里this.mappingRegistry.getMappings().get(mapping).getClass()找到的就是AbstractWebMvcEndpointHandlerMapping$WebMvcEndpointHandlerMethod,也就是就是前面说的注册register方法里放到mappingLookup的HandlerMethod,即HandlerMethod handlerMethod = createHandlerMethod(handler, method);,其中handler就是AbstractWebMvcEndpointHandlerMapping$OperationHandler,这样我们通过上面的步骤一步步将注册到映射的操作进行调用,得到返回结果
JMX与HealthEndpoint
前面在讲JmxEndpointExporter时,创建了EndpointMBean,其中构造方法会从endpoint中获取JmxOperation放到map中
JMX通过RMI连接器RMIConnectionImpl调用JmxMBeanServer,去执行EndpointMBean的invoke方法,比如传参是health,你们最终会找到HealthEndpoint,执行他的health方法:
// EndpointMBean
public Object invoke(String actionName, Object[] params, String[] signature)
		throws MBeanException, ReflectionException {
	// actionName = health;    operations = ["health" -> {DiscoveredJmxOperation}]
	JmxOperation operation = this.operations.get(actionName);
	if (operation == null) {
		String message = "Endpoint with id '" + this.endpoint.getEndpointId() + "' has no operation named "
				+ actionName;
		throw new ReflectionException(new IllegalArgumentException(message), message);
	}
	ClassLoader previousClassLoader = overrideThreadContextClassLoader(this.classLoader);
	try {
		return invoke(operation, params);
	}
	finally {
		overrideThreadContextClassLoader(previousClassLoader);
	}
}

// AbstractDiscoveredOperation
public Object invoke(InvocationContext context) {
	// org.springframework.boot.actuate.endpoint.invoke.reflect.ReflectiveOperationInvoker
	return this.invoker.invoke(context);
}

// ReflectiveOperationInvoker
public Object invoke(InvocationContext context) {
	validateRequiredParameters(context);
	// HealthEndpoint.health()
	Method method = this.operationMethod.getMethod();
	Object[] resolvedArguments = resolveArguments(context);
	ReflectionUtils.makeAccessible(method);
	return ReflectionUtils.invokeMethod(method, this.target, resolvedArguments);
}
这样就调用到HealthEndpoint(extends HealthEndpointSupport)中:
@ReadOperation
public HealthComponent health() {
	HealthComponent health = health(ApiVersion.V3, EMPTY_PATH);
	return (health != null) ? health : DEFAULT_HEALTH;
}

// HealthEndpointSupport
HealthResult<T> getHealth(ApiVersion apiVersion, SecurityContext securityContext, boolean showAll, String... path) {
	HealthEndpointGroup group = (path.length > 0) ? this.groups.get(path[0]) : null;
	if (group != null) {
		return getHealth(apiVersion, group, securityContext, showAll, path, 1);
	}
	return getHealth(apiVersion, this.groups.getPrimary(), securityContext, showAll, path, 0);
}
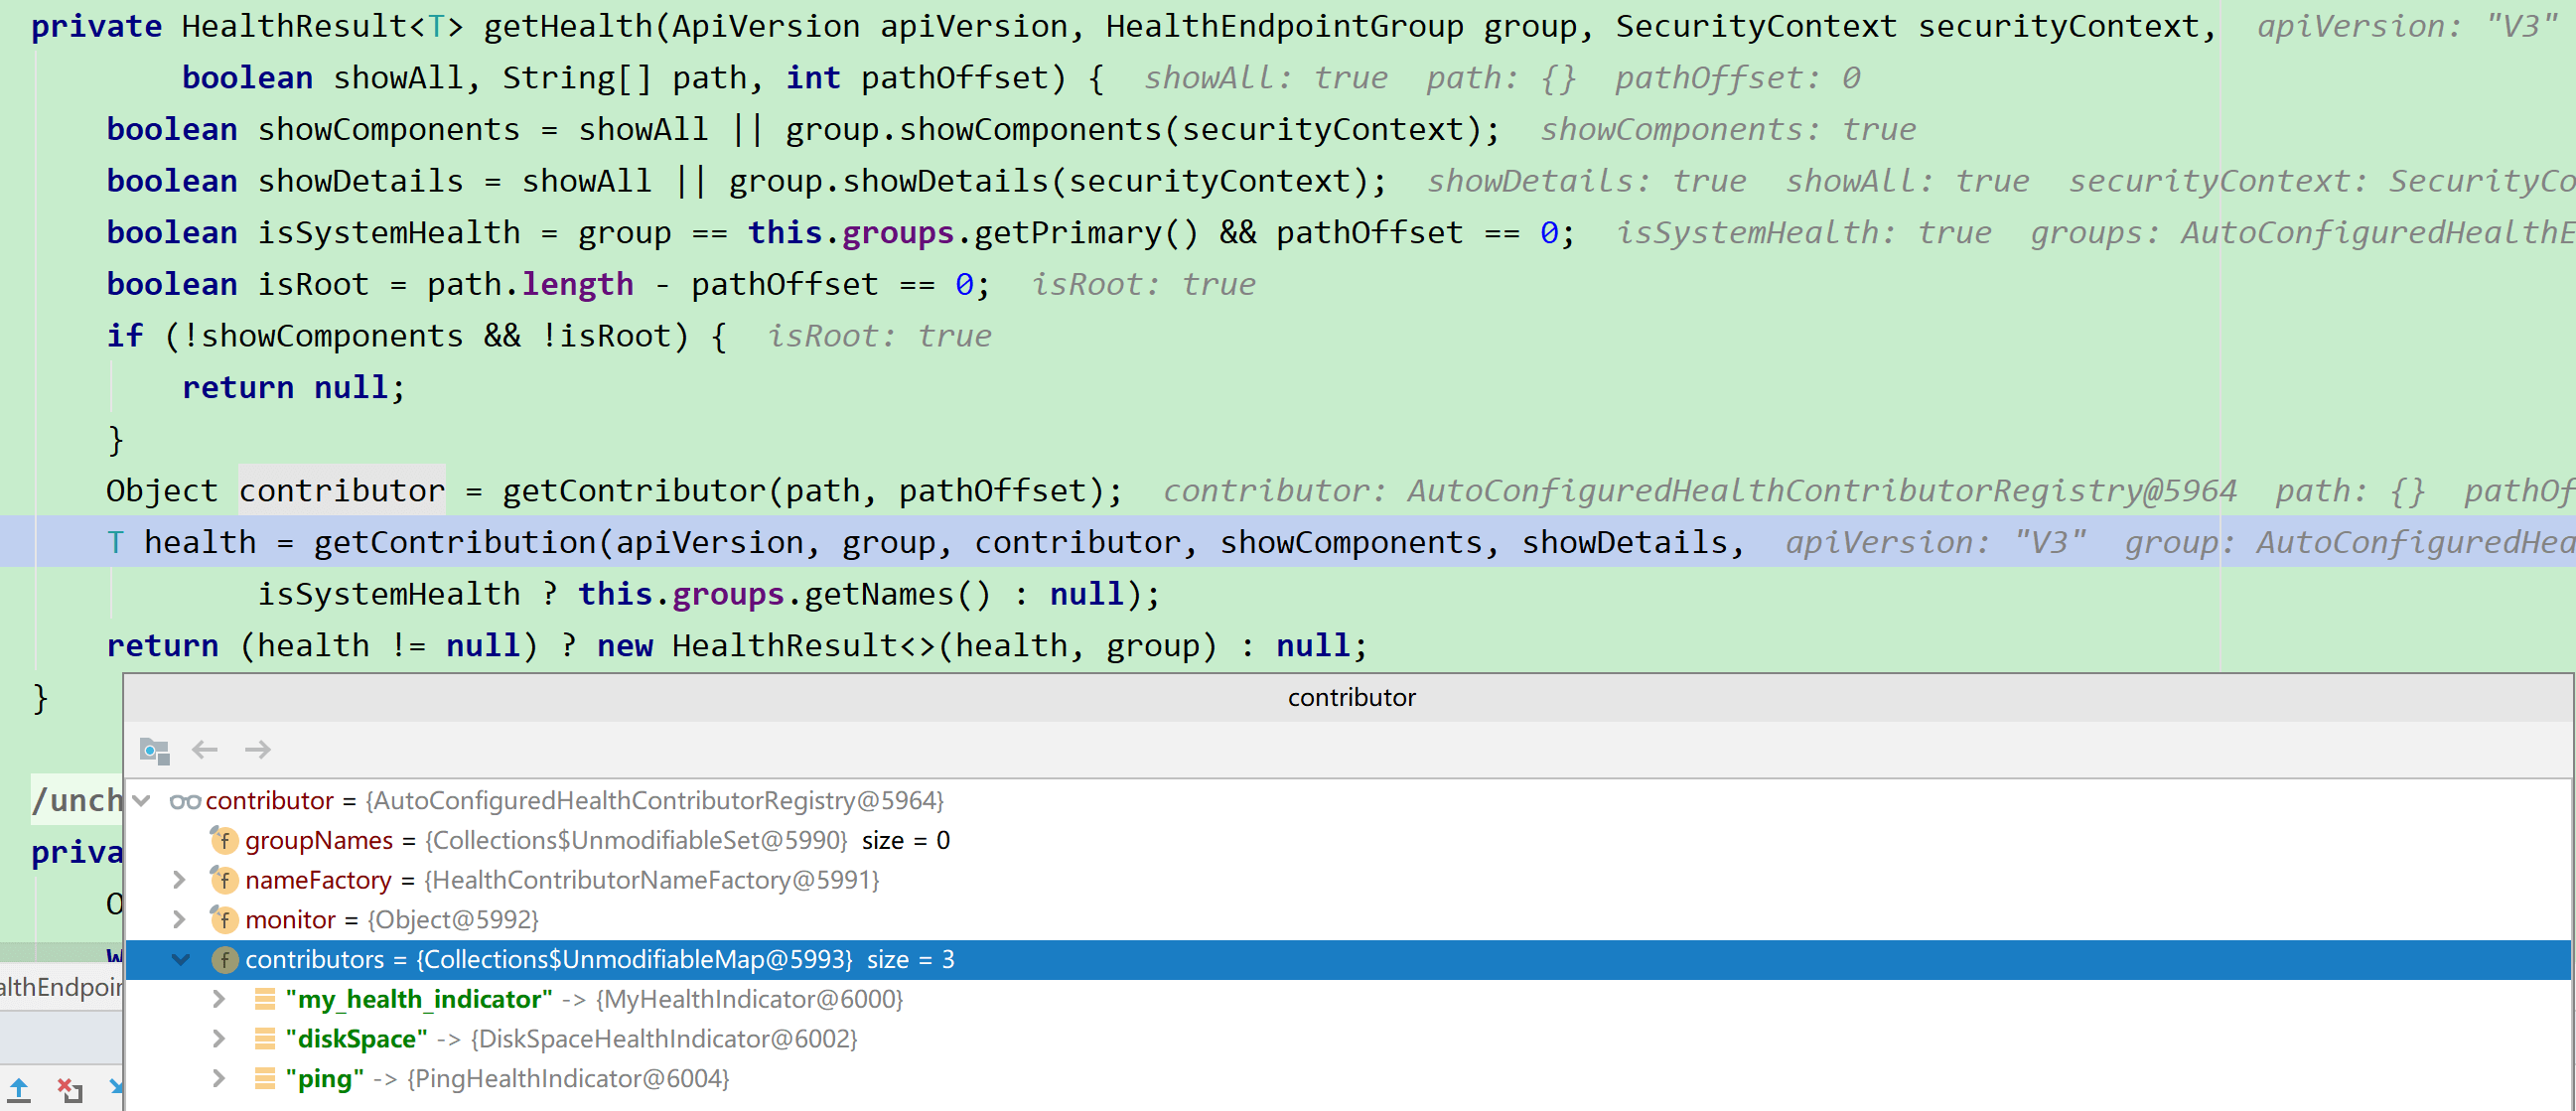
private T getContribution(ApiVersion apiVersion, HealthEndpointGroup group, Object contributor,
		boolean showComponents, boolean showDetails, Set<String> groupNames) {
	if (contributor instanceof NamedContributors) {
		return getAggregateHealth(apiVersion, group, (NamedContributors<C>) contributor, showComponents,
				showDetails, groupNames);
	}
	// 调用HealthEndpoint的getHealth,传入contributor
	return (contributor != null) ? getHealth((C) contributor, showDetails) : null;
}


private T getAggregateHealth(ApiVersion apiVersion, HealthEndpointGroup group,
			NamedContributors<C> namedContributors, boolean showComponents, boolean showDetails,
			Set<String> groupNames) {
	Map<String, T> contributions = new LinkedHashMap<>();
	for (NamedContributor<C> namedContributor : namedContributors) {
		String name = namedContributor.getName();
		C contributor = namedContributor.getContributor();
		if (group.isMember(name)) {
			// 掉回上面的getContribution方法
			T contribution = getContribution(apiVersion, group, contributor, showComponents, showDetails, null);
			if (contribution != null) {
				contributions.put(name, contribution);
			}
		}
	}
	if (contributions.isEmpty()) {
		return null;
	}
	return aggregateContributions(apiVersion, contributions, group.getStatusAggregator(), showComponents,
			groupNames);
}
最后调用我们创建的health()方法,对于healthEndpoint的URL调用方法也是和前面HelloEndpoint同样,只不过最后都是调用到HealthIndicator的具体实现
// HealthEndpointWebExtension
protected HealthComponent getHealth(HealthContributor contributor, boolean includeDetails) {
	return ((HealthIndicator) contributor).getHealth(includeDetails);
}

// MyHealthIndicator(implements HealthIndicator)
default Health getHealth(boolean includeDetails) {
	Health health = health();
	return includeDetails ? health : health.withoutDetails();
}
再反过来看getContributor,其获取的就是HealthEndpointSupport的registry属性,从构造方法中传入,其本质是HealthEndpoint构造方法的super父方法传入的,那么看下创建HealthEndpoint的地方
// HealthEndpointConfiguration
@Bean
@ConditionalOnMissingBean
HealthEndpoint healthEndpoint(HealthContributorRegistry registry, HealthEndpointGroups groups) {
	return new HealthEndpoint(registry, groups);
}
在这个HealthEndpointConfiguration往上面找找,看到了对HealthContributorRegistry的创建
@Bean
@ConditionalOnMissingBean
HealthContributorRegistry healthContributorRegistry(ApplicationContext applicationContext,
		HealthEndpointGroups groups) {
	// 所有HealthContributor类
	Map<String, HealthContributor> healthContributors = new LinkedHashMap<>(
			applicationContext.getBeansOfType(HealthContributor.class));
	if (ClassUtils.isPresent("reactor.core.publisher.Flux", applicationContext.getClassLoader())) {
		healthContributors.putAll(new AdaptedReactiveHealthContributors(applicationContext).get());
	}
	return new AutoConfiguredHealthContributorRegistry(healthContributors, groups.getNames());
}
这就是HealthEndpoint通过JMX和URL两种方式调用的过程
另外,HealthEndpoint的健康状态和HTTP状态码是在LegacyHealthEndpointCompatibilityConfiguration中定义的:
@Bean
@ConditionalOnMissingBean(HealthAggregator.class)
public OrderedHealthAggregator healthAggregator() {
	OrderedHealthAggregator healthAggregator = new OrderedHealthAggregator();
	if (this.properties.getOrder() != null) {
		healthAggregator.setStatusOrder(this.properties.getOrder());
	}
	// 0 = "DOWN"
	// 1 = "OUT_OF_SERVICE"
	// 2 = "UP"
	// 3 = "UNKNOWN"
	return healthAggregator;
}

@Bean
@ConditionalOnMissingBean
HealthStatusHttpMapper healthStatusHttpMapper(HealthIndicatorProperties healthIndicatorProperties) {
	HealthStatusHttpMapper mapper = new HealthStatusHttpMapper();
	if (!CollectionUtils.isEmpty(healthIndicatorProperties.getHttpMapping())) {
		mapper.setStatusMapping(healthIndicatorProperties.getHttpMapping());
	}
	// "DOWN" -> {Integer@5579} 503
	// "OUT_OF_SERVICE" -> {Integer@5581} 503
	return mapper;
}
MetricsEndpoint
在MetricsAutoConfiguration中创建了MeterRegistryPostProcessor:
@Bean
public static MeterRegistryPostProcessor meterRegistryPostProcessor(ObjectProvider<MeterBinder> meterBinders,
		ObjectProvider<MeterFilter> meterFilters,
		ObjectProvider<MeterRegistryCustomizer<?>> meterRegistryCustomizers,
		ObjectProvider<MetricsProperties> metricsProperties, ApplicationContext applicationContext) {
	return new MeterRegistryPostProcessor(meterBinders, meterFilters, meterRegistryCustomizers, metricsProperties,
			applicationContext);
}
其实现了BeanPostProcessor,即启动后会执行postProcessAfterInitialization,这里会对metrics进行绑定注册
public Object postProcessAfterInitialization(Object bean, String beanName) throws BeansException {
	if (bean instanceof MeterRegistry) {
		// 为MeterRegistryConfigurer
		getConfigurer().configure((MeterRegistry) bean);
	}
	return bean;
}

// MeterRegistryConfigurer
void configure(MeterRegistry registry) {
	// Customizers must be applied before binders, as they may add custom
	// tags or alter timer or summary configuration.
	customize(registry);
	addFilters(registry);
	if (!this.hasCompositeMeterRegistry || registry instanceof CompositeMeterRegistry) {
		addBinders(registry);
	}
	if (this.addToGlobalRegistry && registry != Metrics.globalRegistry) {
		Metrics.addRegistry(registry);
	}
}

private void addBinders(MeterRegistry registry) {
	this.binders.orderedStream().forEach((binder) -> binder.bindTo(registry));
}
这里就会调用到我们上篇创建的MyMetrics中,进行绑定注册到MeterRegistry
至于URL调用时也和前面的SpringMVC方式相同,最后在MetricsEndpoint的@ReadOperation方法上,然后从registry中获取,它会返回所有指标的名称
@ReadOperation
public ListNamesResponse listNames() {
	Set<String> names = new LinkedHashSet<>();
	collectNames(names, this.registry);
	return new ListNamesResponse(names);
}

private void collectNames(Set<String> names, MeterRegistry registry) {
	if (registry instanceof CompositeMeterRegistry) {
		((CompositeMeterRegistry) registry).getRegistries().forEach((member) -> collectNames(names, member));
	}
	else {
		registry.getMeters().stream().map(this::getName).forEach(names::add);
	}
}
而要取得具体的指标参数就需要通过比如metrics/test来获取
public MetricResponse metric(@Selector String requiredMetricName, @Nullable List<String> tag) {
	List<Tag> tags = parseTags(tag);
	// 此例中,其value是个lambda,因此就可以进行数值的变化(累加)
	Collection<Meter> meters = findFirstMatchingMeters(this.registry, requiredMetricName, tags);
	if (meters.isEmpty()) {
		return null;
	}
	// 获取算出来的具体数值
	Map<Statistic, Double> samples = getSamples(meters);
	// 标签等
	Map<String, Set<String>> availableTags = getAvailableTags(meters);
	tags.forEach((t) -> availableTags.remove(t.getKey()));
	Meter.Id meterId = meters.iterator().next().getId();
	// 最后封装返回
	return new MetricResponse(requiredMetricName, meterId.getDescription(), meterId.getBaseUnit(),
			asList(samples, Sample::new), asList(availableTags, AvailableTag::new));
}
SOFABoot
SOFABoot在SpringBoot的Liveness检查能力的基础上,增加了Readiness检查能力
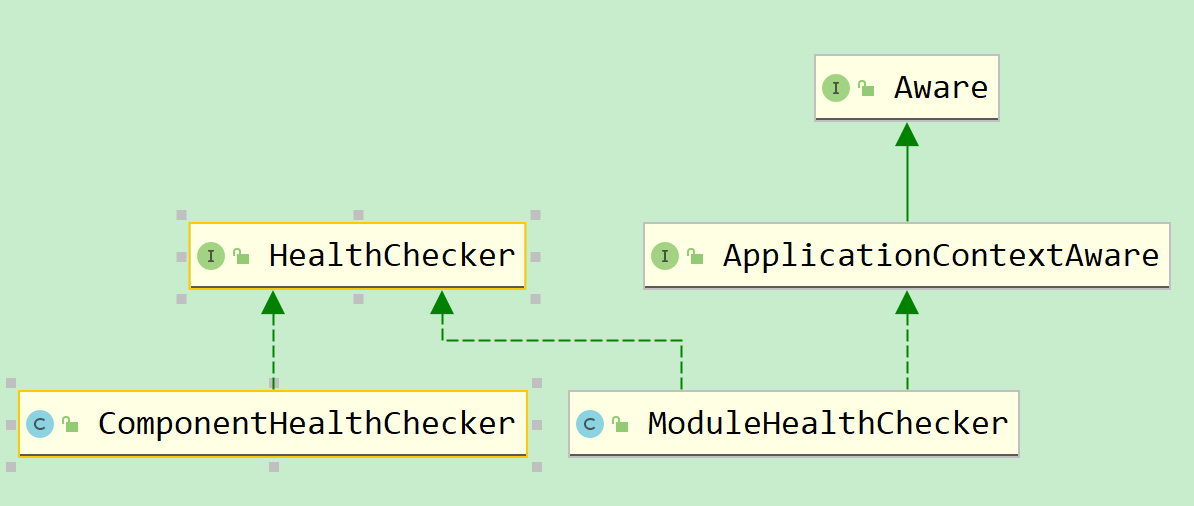
与SpringBoot提供的HealthIndicator相似,SOFABoot提供了HealthChecker接口,是一个顶层接口。各SOFABoot中间件,通过实现HealthChecker接口,提供中间件的Readiness检查能力。例如:runtime-sofa-boot-starter提供了SofaComponentHealthChecker类,实现了SOFABoot中所有注册组件的Readiness检查功能。isle-sofa-boot-starter提供了SofaModuleHealthChecker类,实现了SOFABoot模块化开发中,每个模块的的Readiness检查功能
在Readiness Check的各个阶段,SOFABoot都提供了扩展的能力,应用可以根据自己的需要进行扩展,目前可供扩展的点如下:
- org.springframework.context.ApplicationListener
- 如果想要在Readiness检查之前做一些事情,那么监听这个Listener的SofaBootBeforeHealthCheckEvent事件
- org.springframework.boot.actuate.health.HealthIndicator
- 如果想要在SOFABoot的Readiness检查里面增加一个Liveness检查项,那么可以实现HealthIndicator接口
- com.alipay.sofa.healthcheck.core.HealthChecker
- 如果想要在SOFABoot的Readiness检查里面增加一个Readiness检查项,那么可以实现HealthChecker接口
- com.alipay.sofa.healthcheck.startup.SofaBootAfterReadinessCheckCallback
- 如果想要在Readiness Check之后做一些SOFABoot应用级别的事情,例如端口是否可用等,那么可以扩展SOFABoot的这个接口
- com.alipay.sofa.healthcheck.startup.SofaBootMiddlewareAfterReadinessCheckCallback
- 如果想要在Readiness Check之后做一些SOFABoot中间件级别的事情,例如某个Server是否启动成功,那么可以扩展SOFABoot的这个接口
ReadinessCheckListener
ReadinessCheckListener实现了ApplicationListener监听器接口,其所监听的事件对象是ContextRefreshedEvent,即当容器上下文刷新完成之后回调。SOFABoot中通过这个监听器来完成readniessCheck的处理。onApplicationEvent回调方法:
public void onApplicationEvent(ContextRefreshedEvent event) {
    // healthCheckerProcessor init
    healthCheckerProcessor.init();
    // healthIndicatorProcessor init
    healthIndicatorProcessor.init();
    // afterReadinessCheckCallbackProcessor init
    afterReadinessCheckCallbackProcessor.init();
    // readiness health check execute
    readinessHealthCheck();
最后再来补充下liveness和readiness,从字面意思来理解,liveness就是是否是活的,readiness就是意思是否可访问的
- readiness:应用即便已经正在运行了,它仍然需要一定时间才能提供服务,这段时间可能用来加载数据,可能用来构建缓存,可能用来注册服务,可能用来选举Leader等等。总之Readiness检查通过前是不会有流量发给应用的。目前SOFARPC就是在readiness check之后才会将所有的服务注册到注册中心去
- 扩展:Kubelet使用readiness probe(就绪探针)来确定容器是否已经就绪可以接受流量。只有当Pod中的容器都处于就绪状态时kubelet才会认定该Pod处于就绪状态。该信号的作用是控制哪些Pod应该作为service的后端。如果Pod处于非就绪状态,那么它们将会被从service的load balancer中移除
- liveness:检测应用程序是否正在运行
- 扩展:Kubelet使用liveness probe(存活探针)来确定何时重启容器。例如当应用程序处于运行状态但无法做进一步操作,liveness探针将捕获到deadlock,重启处于该状态下的容器,使应用程序在存在bug的情况下依然能够继续运行下去